
Mega Menu & Burger — Complete guide
Install, build and publish a mega menu, a dropdown menu and a multi-level mobile burger: visual builder, blocks, badges, visibility by group, live preview, ps_mainmenu import, cache and accessibility, for PrestaShop 1.7.8, 8 and 9.
Overview
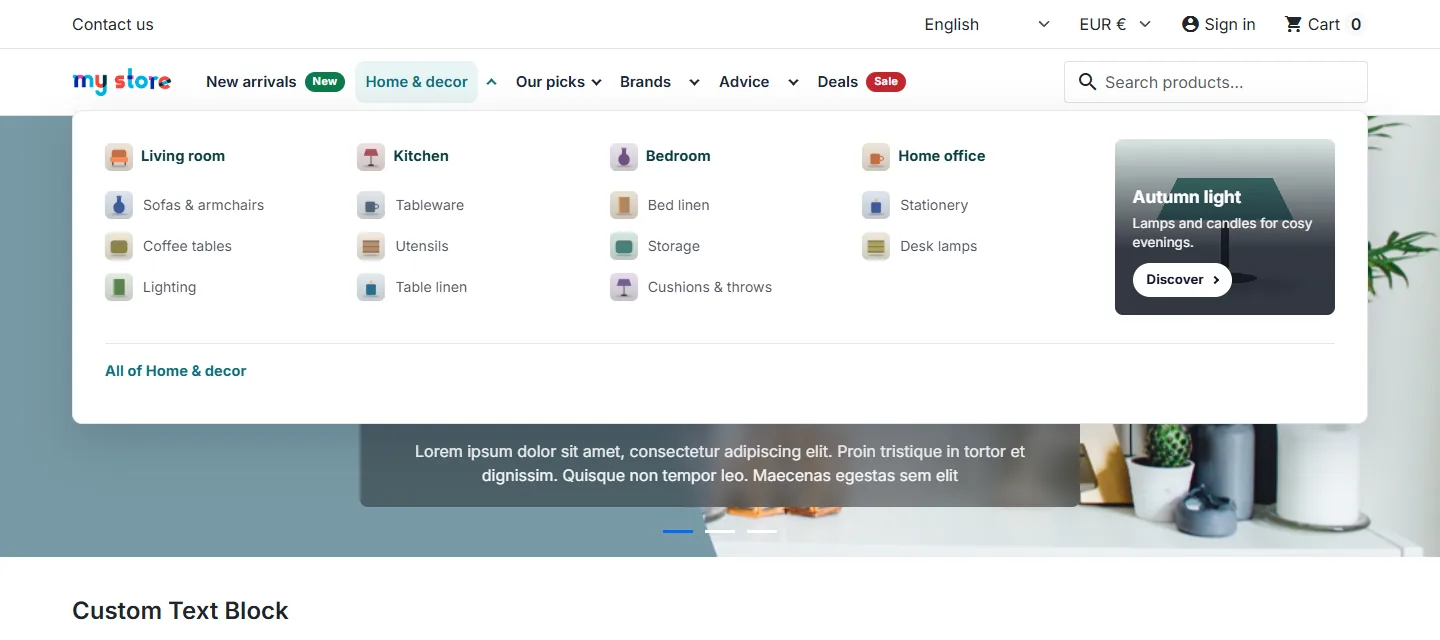
The Mega Menu & Burger module (datafireflymegamenu) replaces your shop’s navigation with a complete system: a column-based mega menu, a multi-level dropdown menu and a mobile burger that is browsed level by level. Everything is built in the back office with a visual builder and a live preview on desktop, tablet and mobile.
A menu can display categories (including an automatically generated tree), products, brands, suppliers, CMS pages, custom links and content blocks: featured products, categories with images, brand logos, banners, images, CMS page content and restricted HTML. Each item can carry a badge (New, Sale, Hot or custom) and visibility rules by customer group, shop, language, device and period.
What’s new in version 2.0.0: PrestaShop 1.7.8 compatibility, visual builder with a block library, live preview, keyboard navigation and modal burger designed following the WAI-ARIA recommendations, server cache per customer group, JSON import/export, history with undo, import of the native ps_mainmenu menu and 8 languages.
Compatibility
- PrestaShop 1.7.8, 8.x and 9.x. Tested versions: 1.7.8.11 (PHP 7.4), 8.2.1 (PHP 8.1) and 9.1.5 (PHP 8.5).
- Classic and Hummingbird themes, and custom themes that display the chosen hook.
- Single shop and multistore.
- Interface and front-office texts in 8 languages: French, English, Spanish, German, Italian, Polish, Dutch and Portuguese. Each menu label can be translated into every language of the shop.
- No external dependencies: no third-party JavaScript library on the front office, no external font.
Installation and update
- In the back office, open Modules > Module Manager and click Upload a module.
- Select the file
datafireflymegamenu-2.0.0.zip. - Open Modules > Mega menu (or click the module’s Configure button).
On installation, a demo menu is created offline on the displayTop hook: your shop’s header does not change until you click Put online.
Updating from a 1.x version: simply upload the 2.0.0 zip over the installed version. Menus, items, translations, uploaded images, colours and settings are kept; the database schema is completed automatically. Any javascript: links saved with an older version are never displayed again.
Quick start
- Open Modules > Mega menu. The demo menu is selected.
- In the Structure tab, click a block in the library (for example Category tree (automatic)) to add it.
- Choose the starting category and the number of sub-levels, then save.
- Check the result in the Live preview, on desktop and mobile.
- Click Put online.
Does your theme already use PrestaShop’s native menu? Use Import > Import from ps_mainmenu to retrieve its entries in one click (see below).
Visual builder
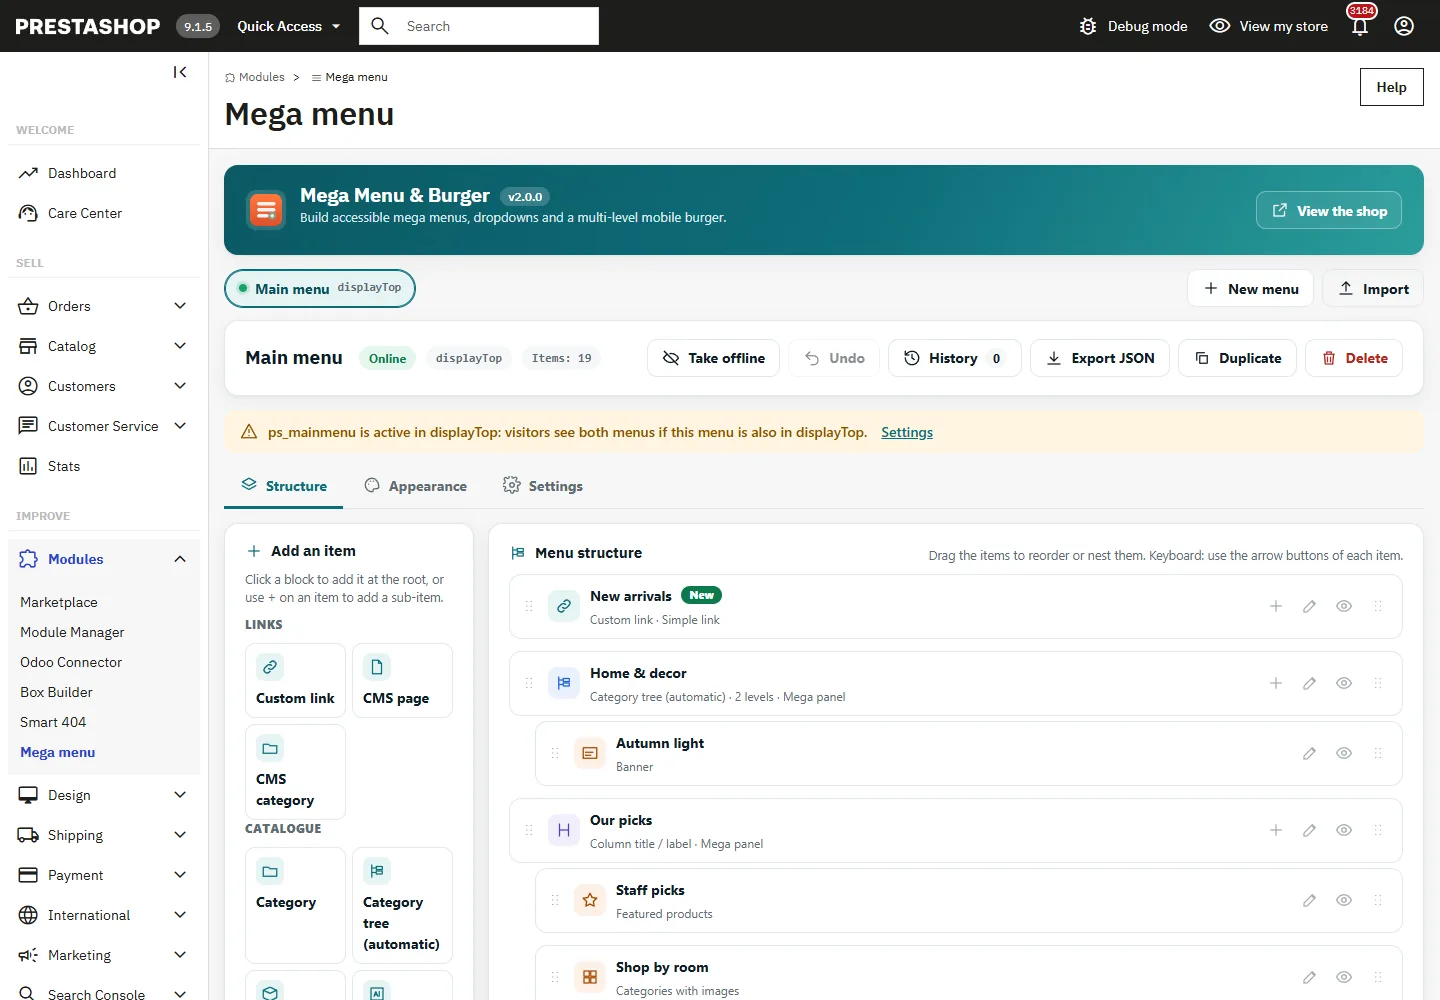
The Structure tab brings together the block library and the menu tree. Each row of the tree shows the item type, its label, its badge and indicators: hidden item, scheduled, restricted to some groups or to some devices.
- Add: click a block in the library to add it at the root, or click an item’s + to add a sub-item.
- Reorder: drag an item’s handle to move or nest it.
- With the keyboard: each item’s More actions button offers Move up, Move down, Nest in the previous item and Move out one level.
- Duplicate, hide or delete an item and its sub-items from the same row.
The link counter below the tree shows how many links a visitor sees. Above 120, a tip is displayed: a very long menu dilutes internal linking and slows down reading.
Item types and content blocks
The library is organised into four families:
- Links: custom link, CMS page, CMS category.
- Catalogue: category, automatic category tree, product, brand, all brands, supplier.
- Content blocks: banner (image, title, text and button), featured products (hand-picked, new products, on sale or best sellers), categories with images, brand logos, image, restricted HTML, CMS page content.
- Structure: column title or label, divider.
The editor opens in a side panel with three tabs: Content (labels, links, texts and images, translated per language), Display (sub-menu, columns, width, icon, badge, CSS class, new tab) and Visibility.
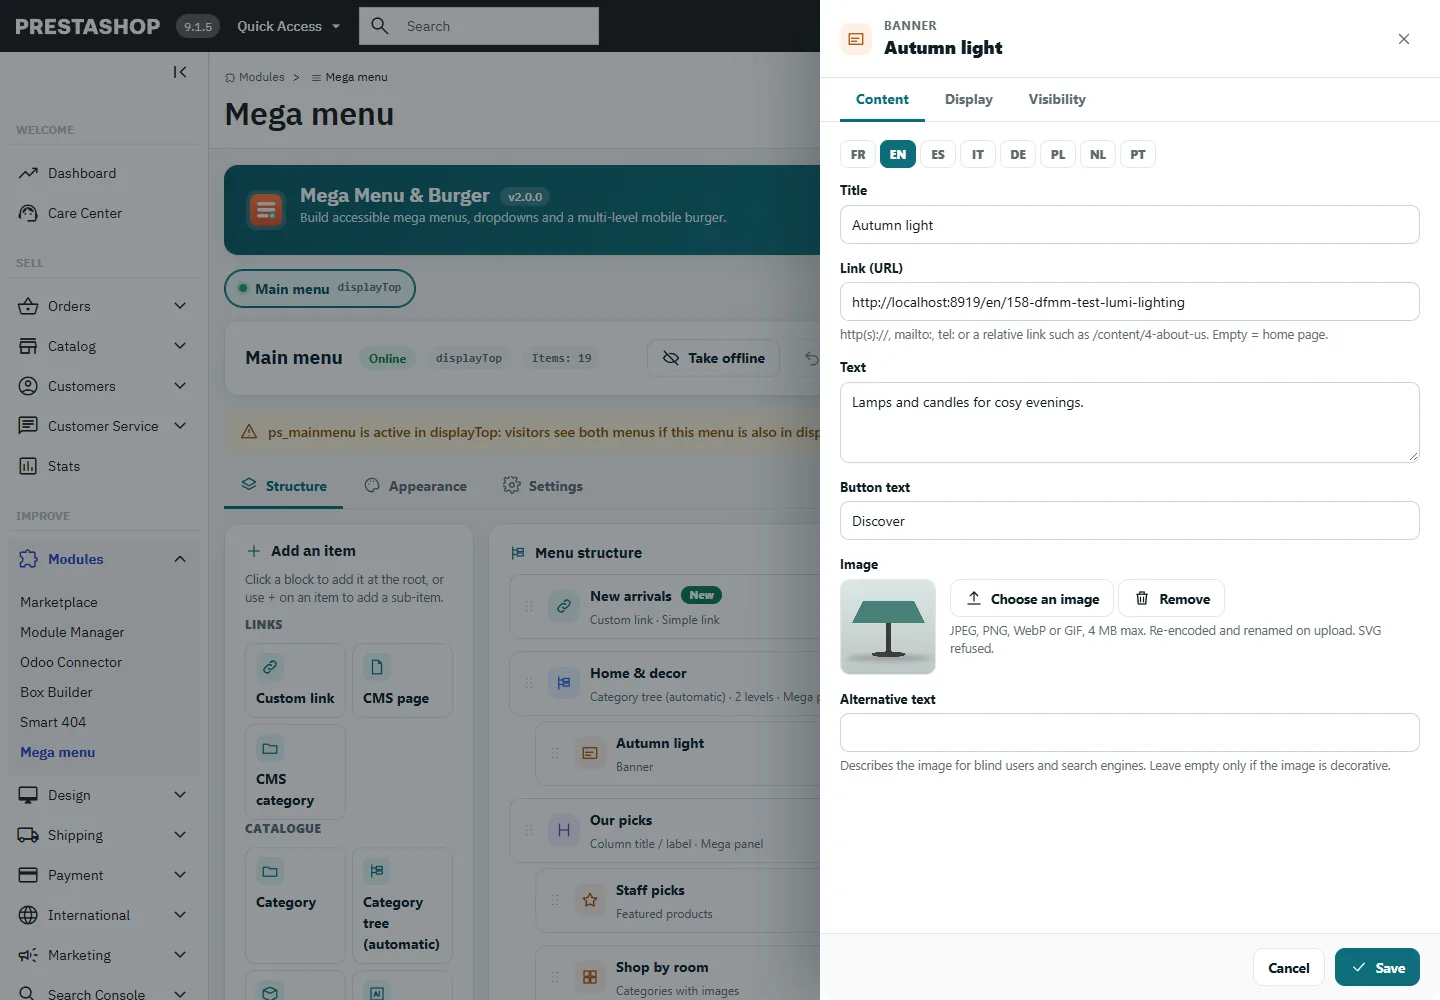
Accepted links: http(s)://, mailto:, tel: and relative links (for example /content/4-about-us). Other schemes, including javascript: and data:, are refused when saving.
Restricted HTML: paragraphs, headings, lists, bold, italic, links, images and tables. Scripts, styles, forms, iframes, SVG and event attributes (onclick…) are removed when saving and when displaying. A message warns you when an element has been removed.
Uploaded images: JPEG, PNG, WebP (PrestaShop 8 and later) or GIF, 4 MB maximum. Their content is checked, then they are re-encoded and renamed; SVG files are refused. Fill in the Alternative text of every image that conveys information.
Mega menu: columns and blocks
To turn a sub-menu into a mega panel, open the parent item, go to the Display tab and choose Sub-menu: Mega panel. Then set the number of columns (1 to 6).
Each direct child becomes a column: a title with its list of links, or a block (banner, products, categories with images…). The width of each column is set as a number of columns occupied. A Category tree item in a mega panel generates one column per sub-category on its own, with thumbnails and an “All of…” link.
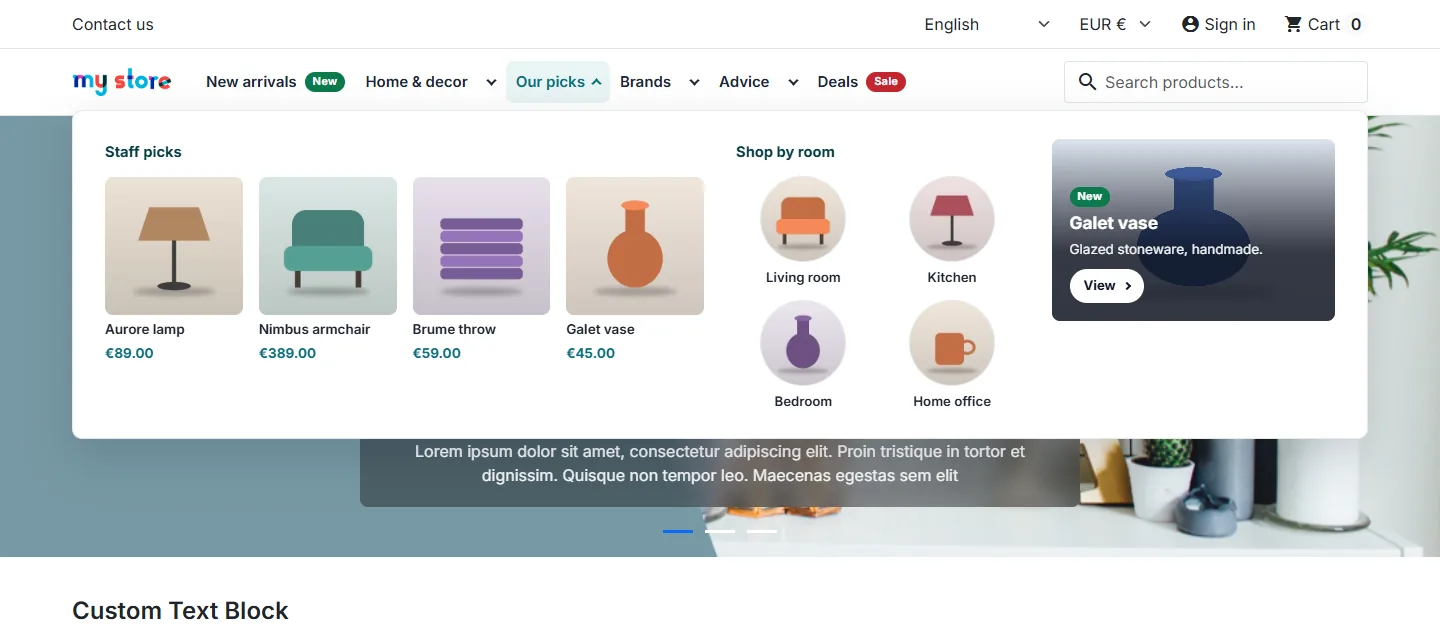
The width of mega panels is set in Appearance: limited to the theme container, full screen width or fitted to the content.
Badges
Each item can display a New, Sale, Hot or custom badge. The default text is translated into the visitor’s language and can be replaced language by language. The colour of the standard badges is set in Appearance; for a custom badge, choose its colour: the text is shown in black or white, whichever gives the better contrast.
Visibility by group, shop, language, device and period
The editor’s Visibility tab restricts an item to certain visitors:
- Devices: mobile (under 768 px), tablet (768 to 1199 px), desktop (1200 px and above).
- Customer groups: none ticked = everybody.
- Languages and Shops (multistore).
- Period: start and end date and time, in the shop’s time zone.
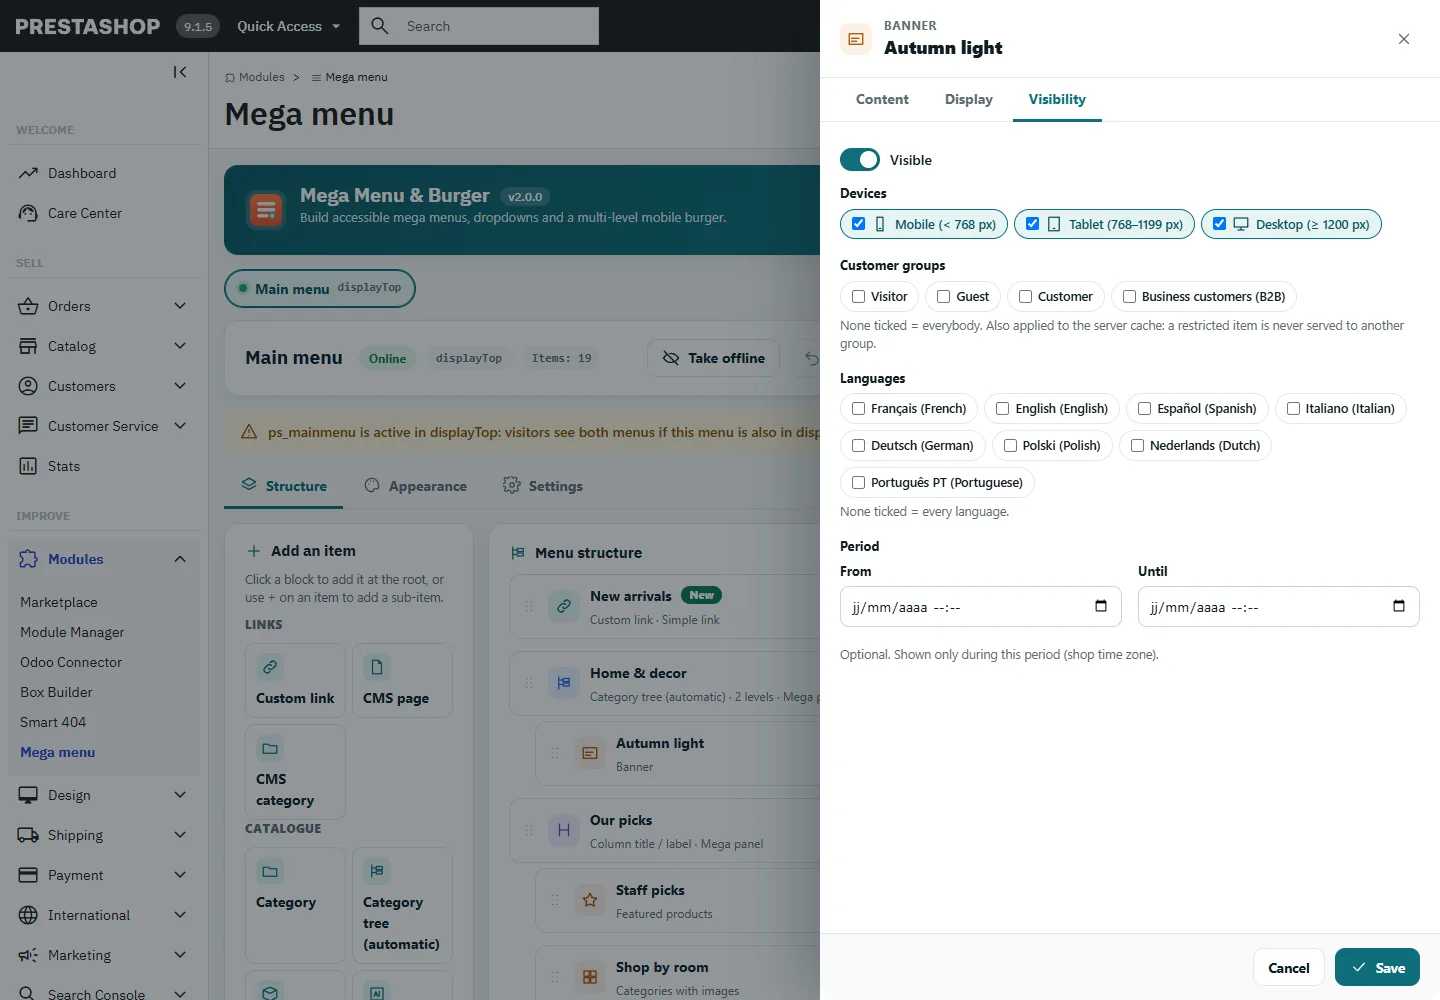
Regardless of these rules, the module never displays a category that is inactive, missing from the shop or restricted to other groups, an inactive or invisible product, or an inactive CMS page, brand or supplier. These checks also apply to the cache: a visitor never receives the version intended for another group.
Appearance and contrast check
The Appearance tab offers four ready-made themes (Light, Dark, Brand, Soft) and settings for the colours of the bar, panels and burger, typography (theme font or system font, size, weight, capital letters, letter spacing), padding, alignment, width, corner radius, shadow and animation.
The Contrast check block calculates, in real time, the contrast ratio of each text colour against its background, using the WCAG 2.2 formula (criterion 1.4.3, 4.5:1 threshold for text). A transparent bar is measured against white.
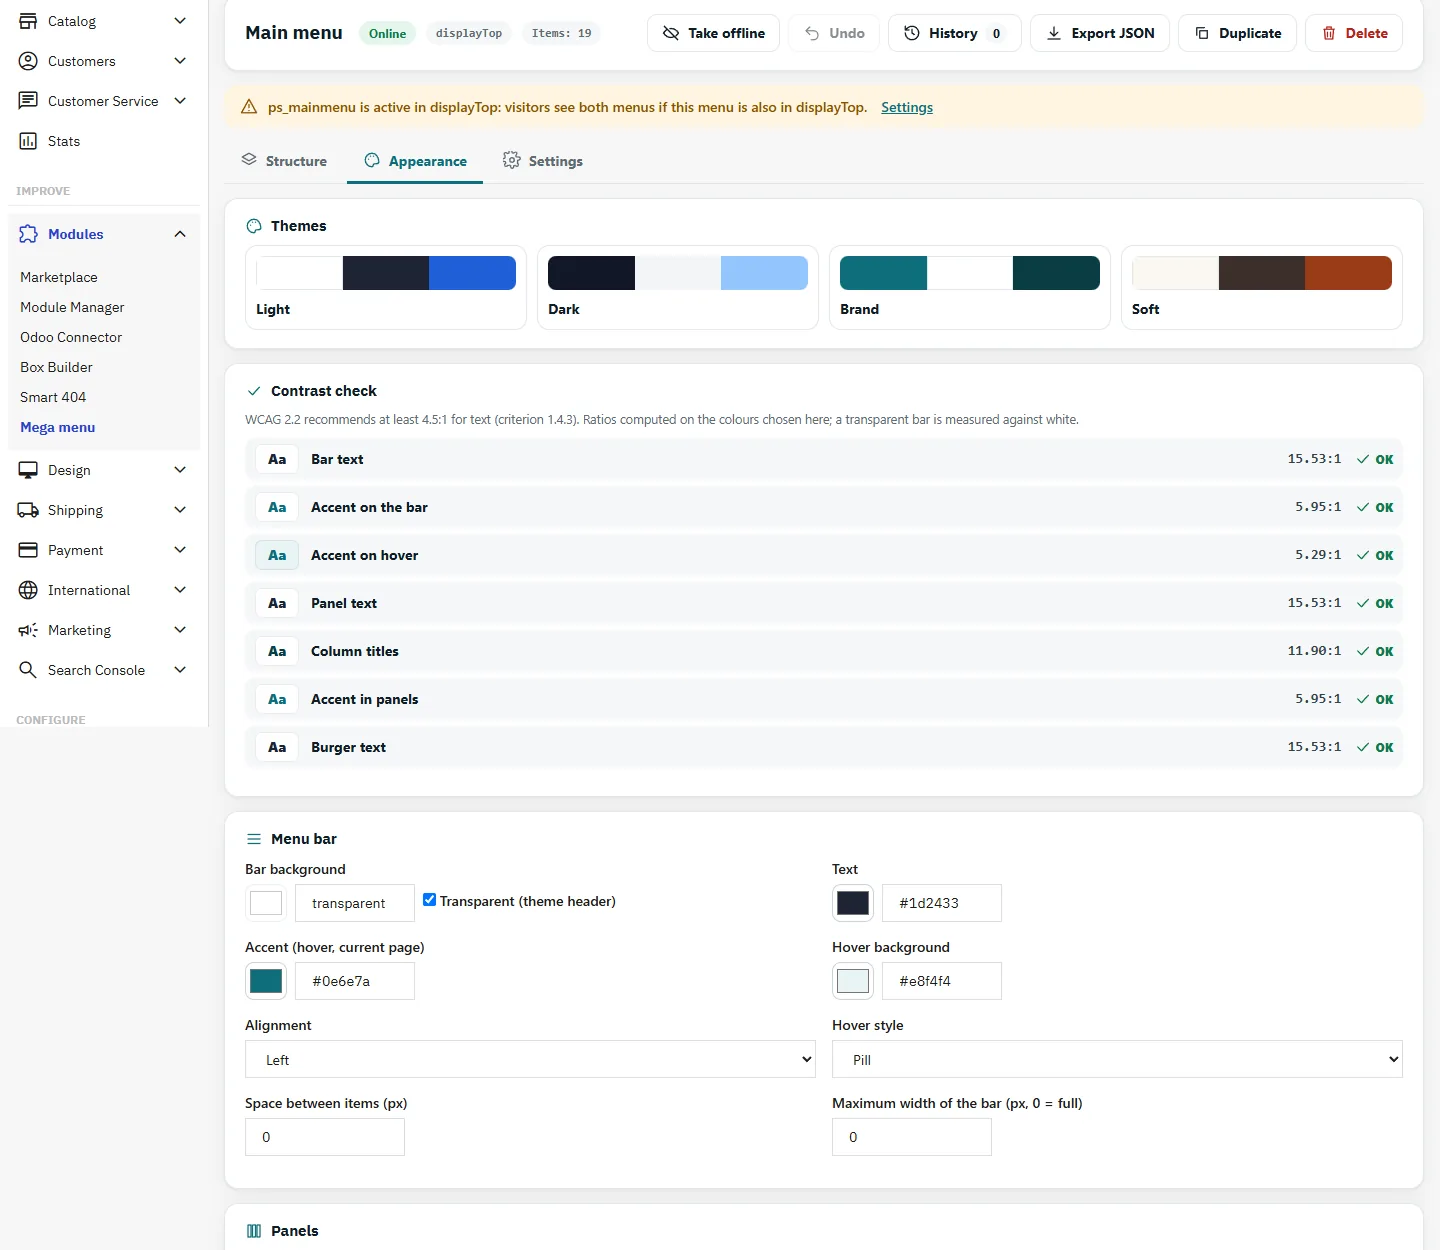
Animations are switched off for visitors who ask their system to reduce motion (prefers-reduced-motion). Colours are served in a style sheet generated per menu: no <style> tag or style attribute is added to your pages.
Live preview
The preview shows the saved menu exactly as the chosen group sees it (Visitor, Customer, Professional…) in the chosen language, on desktop, tablet or mobile, even when the menu is offline. The Open the first panel option expands the first mega panel, or the burger in the mobile view.
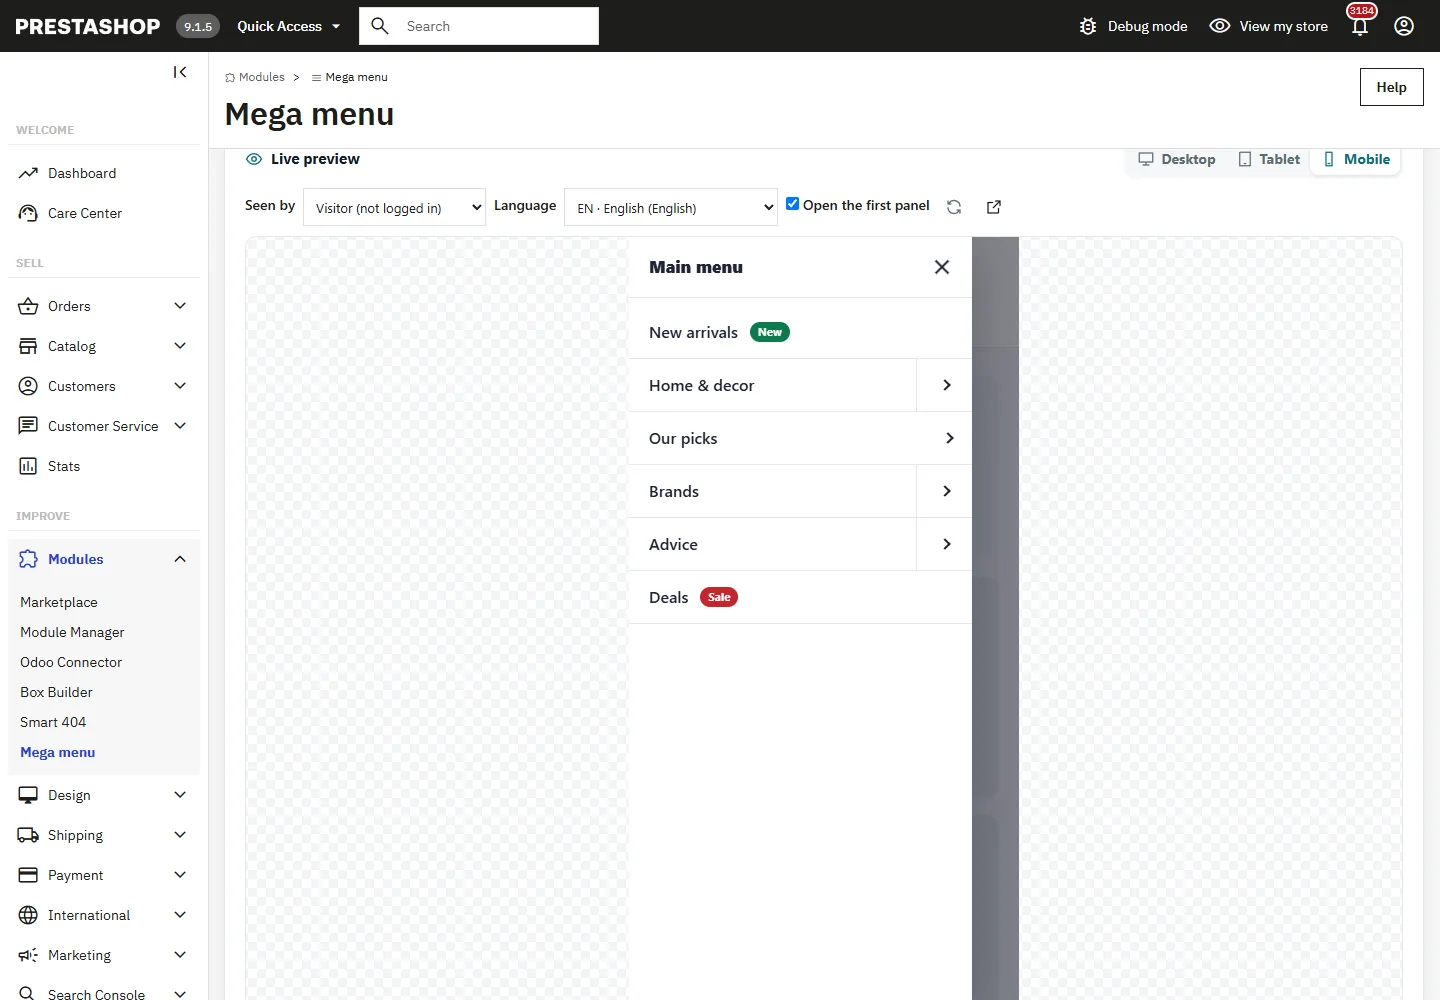
The preview link is signed and valid for 2 hours; it cannot be altered or indexed by search engines.
Multi-level mobile burger
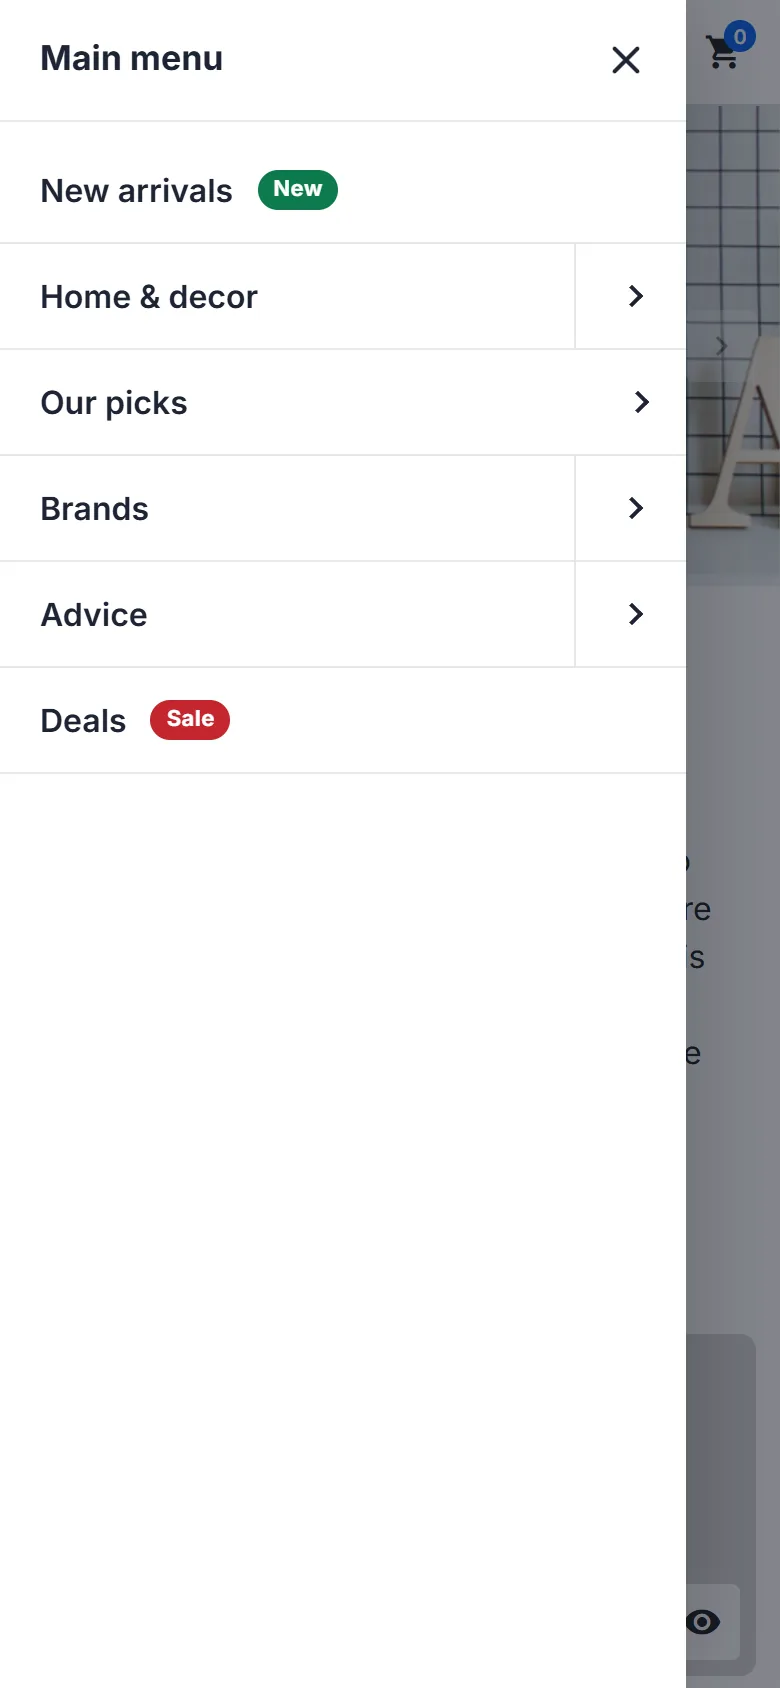
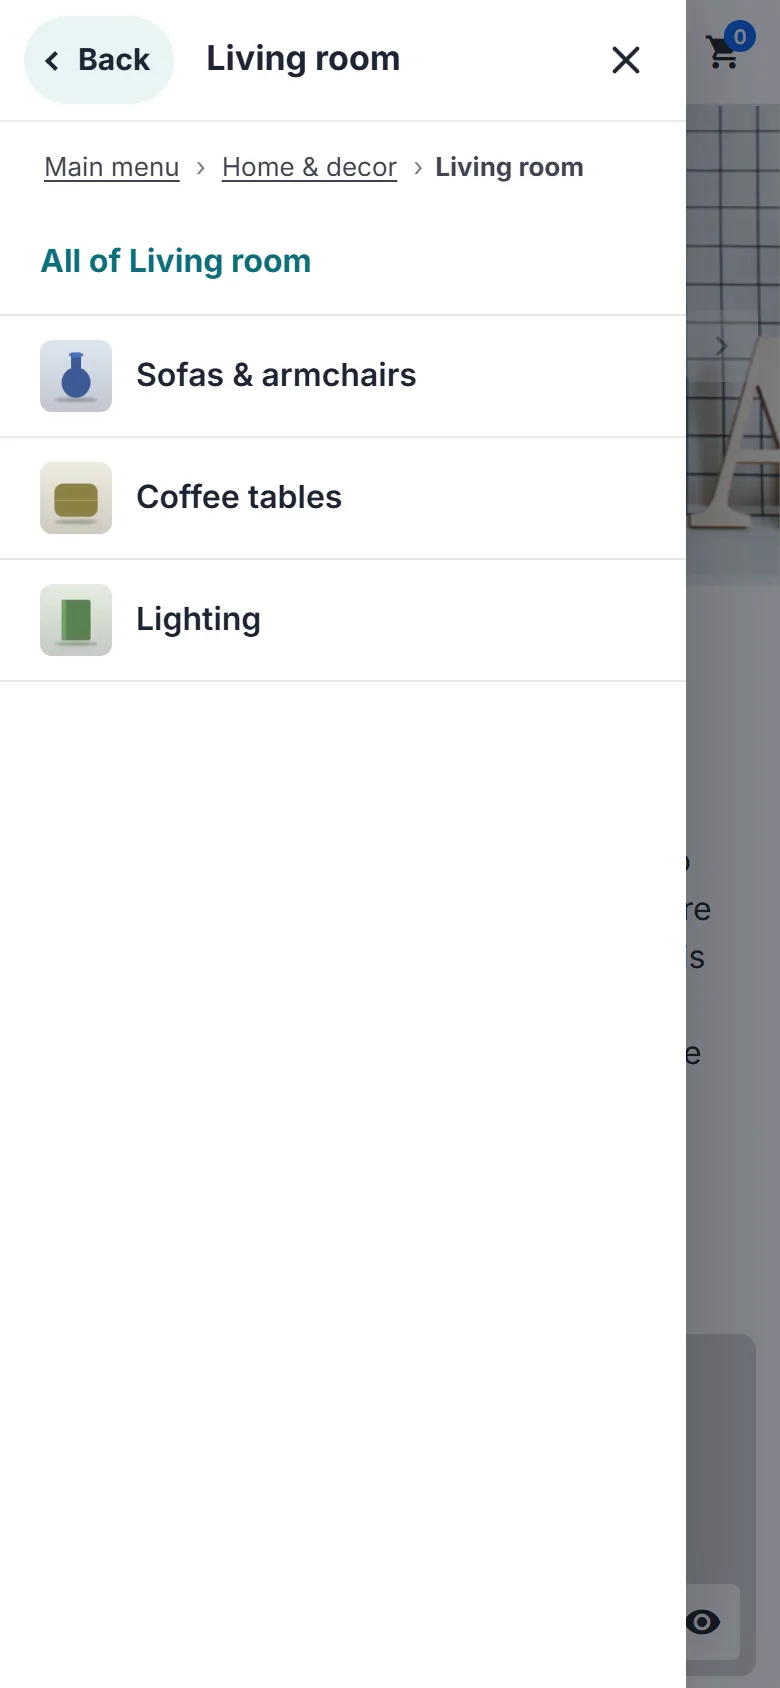
Below the breakpoint (991 px by default), the bar gives way to a Menu button. It opens a modal side panel:
- one level at a time, with a button for each sub-menu and an “All of…” link at the top of each level;
- a Back button and a clickable breadcrumb for the current level;
- page scrolling is locked while the burger is open;
- Escape, the Close button or a click outside the panel closes it, and focus returns to the Menu button.
Keyboard, hover and touch navigation
Navigation follows the “disclosure navigation” pattern of the WAI-ARIA Authoring Practices: links remain links, and each sub-menu opens with a button that announces its state (aria-expanded).
- Keyboard: Tab moves through links and buttons, Enter or Space opens a sub-menu, Escape closes it and returns focus to the button. Arrow keys are available as an option. No keyboard trap.
- Hover: adjustable opening and closing delays, and a tolerance zone that keeps the panel open while the pointer moves diagonally towards it.
- Touch: on tablets, a first tap opens the sub-menu and a second tap follows the link.
The module is designed following the WAI-ARIA APG and WCAG 2.2 recommendations. Tests carried out: axe-core (0 violations on the closed menu, the open menu and the burger), automated keyboard and touch journeys in Chrome, on PrestaShop 1.7.8, 8 and 9. No conformity is claimed: a site’s conformity also depends on its theme and content.
Menu settings
- Menu name (per language): accessible name of the navigation and title of the burger.
- Position (hook):
displayTop(main menu of Classic and Hummingbird),displayNavFullWidth,displayNav1,displayNav2,displayFooter,displayLeftColumn,displayRightColumnordisplayDfMegaMenu. In a theme template, you can also write{widget name='datafireflymegamenu' id_menu=1}. - Open panels on: hover (with delay) and click, or click only; opening and closing delays.
- Column titles as accordions: never, on mobile, on desktop or always.
- Burger below (px), burger enabled or not, sticky bar on desktop and on mobile, “All of…” link at the top of each burger level.
- Shops (multistore).
The sticky bar reserves its space in the page: the content does not shift when it becomes fixed. With the Hummingbird theme, whose header is already sticky, this option is not needed.
Import, export, duplication and history
- Export JSON: downloads the complete menu, images included, to back it up or copy it to another shop.
- Import: creates a new offline menu from an exported file. The file’s links, HTML and images are checked in the same way as manual input.
- Duplicate a menu or an item (with its sub-items).
- History: a version is kept before each change (40 most recent). Undo returns to the previous version; Restore returns to any version in the list.
Import from ps_mainmenu
Import > Import from ps_mainmenu reads the shop’s native main menu and rebuilds it as a new menu: categories become automatic trees in a mega panel, and custom links, CMS pages, brands, suppliers and products are kept.
Two options: put the new menu online right away, and disable ps_mainmenu. Disabling can be reversed at any time from Settings, and ps_mainmenu is re-enabled automatically if you uninstall the module.
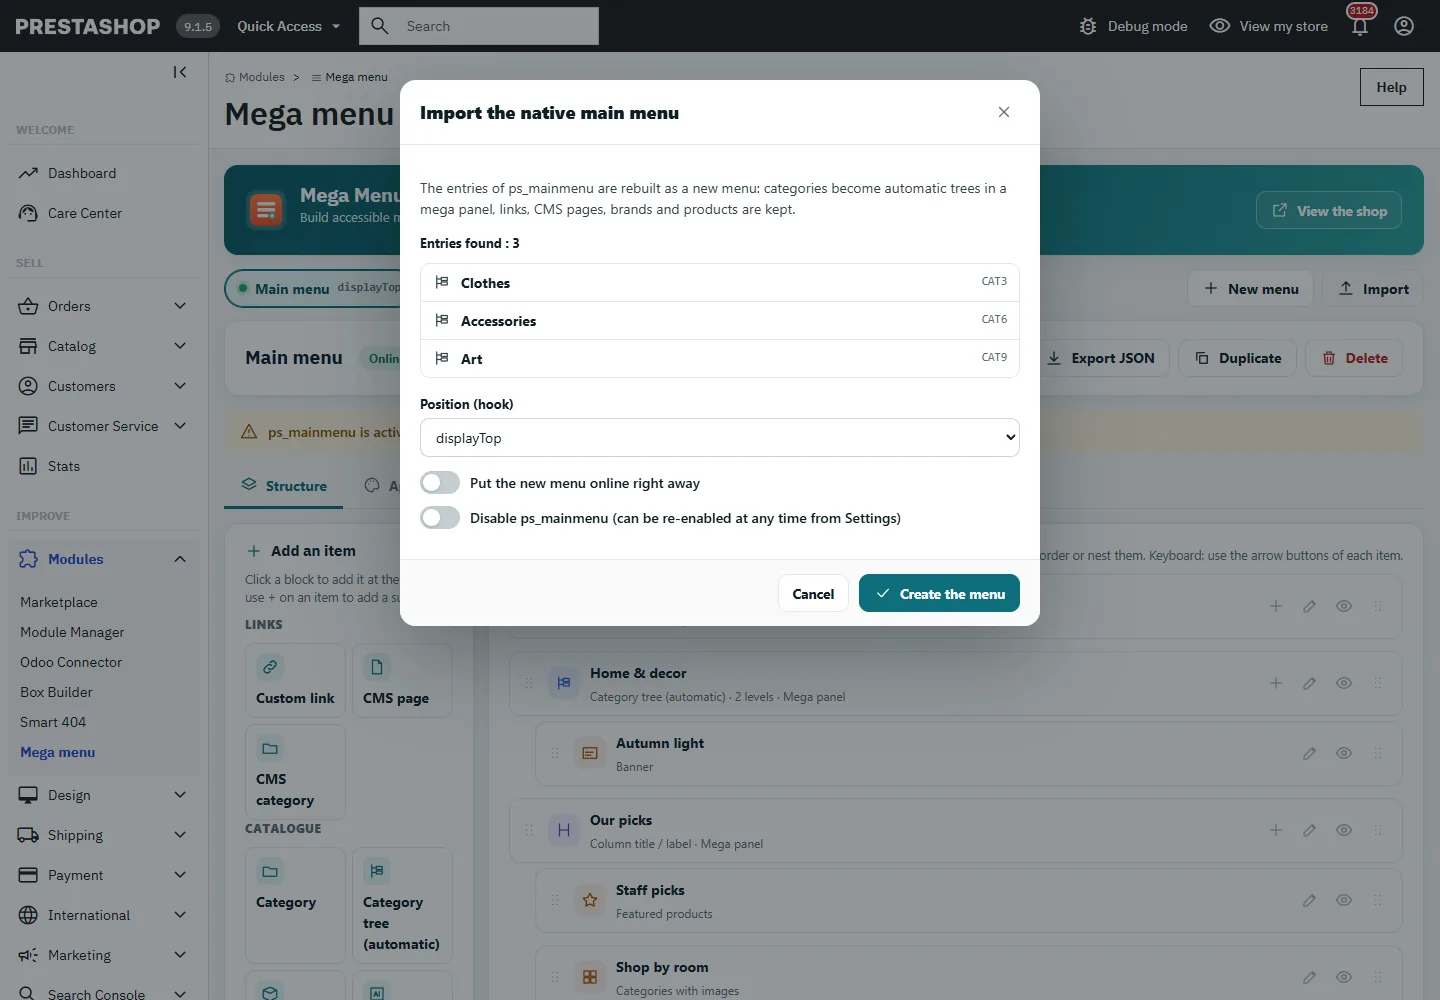
If ps_mainmenu remains active in displayTop while your menu is also online there, an alert is shown in the back office: visitors would see two menus.
Cache and performance
The HTML of each menu is cached on the server, with one entry per shop, language, currency, list of the visitor’s groups and period (scheduled items). The cache is emptied automatically whenever a menu, category, product, specific price, CMS page or category, brand, supplier, image, currency, language, group or shop changes. A maximum lifetime (6 hours by default) is set in Settings > Server cache, along with an Empty the cache button.
All links are real HTML links rendered by the server, readable by search engines. Images are lazy-loaded (loading="lazy") with their dimensions, and the front office uses no external library.
Security and permissions
- Every back-office action checks the PrestaShop security token; changes are sent via POST from the module page.
- Permissions on the Mega menu tab are respected: an employee with read-only access can browse the menus and the preview without being able to change anything.
- In multistore, an employee only sees and edits the menus of the shops in their context.
- The front office adds no inline script or style: the menu has been tested with a strict Content Security Policy (CSP), without
'unsafe-inline'for styles, such as the one the DataFirefly Security Headers module can send.
Uninstallation
Uninstalling deletes the module’s menus, items, history, uploaded images, generated style sheets, cache and settings. Export your menus to JSON beforehand if you want to keep them.
FAQ and troubleshooting
The menu does not appear on the front office
Check that the menu is online, that the module is enabled, that the menu is assigned to the right shop and that its hook is displayed by your theme (displayTop for Classic and Hummingbird). Then clear the PrestaShop cache.
I see two menus
ps_mainmenu is still active in the same position. Disable it from Settings > Native main menu (ps_mainmenu), or change your menu’s hook.
An item does not appear for a visitor
Check its Visibility tab (groups, languages, devices, period) and the status of the linked object: a category that is inactive or restricted to another group, or an invisible product, is never displayed. The preview, set to the visitor’s group, shows exactly what they see.
My link is refused
Only http(s)://, mailto:, tel: and relative links are accepted. For a video or embedded content, use a banner or an image that links to the video’s page: iframes are not accepted in restricted HTML.
A change does not appear straight away
The cache is emptied automatically after every change. If you have modified the theme files, also clear the PrestaShop cache in Advanced Parameters > Performance.
The command-line update fails
With PrestaShop 8.2.1, the bin/console prestashop:module upgrade command may stop on an internal core error (“Undefined array key”). Update the module from the back office by uploading the zip: your data is kept.