
Migrate a PrestaShop shop with DataFirefly Server Migration
Check the shop, build the package, send it to the new server, restore it with the standalone installer and go live with the checklist.
Overview
DataFirefly Server Migration moves a whole PrestaShop shop, files and database, to a new server, a new domain or a sub-folder. The back office guides you through five steps: Checks, Package, Transfer, Restore and Go live. On the new server, a standalone installer restores the shop and rewrites everything that depends on the old server.
Your current shop is only read: files are opened read-only and the database is exported with read queries. The module writes only in its own storage folder.
The module runs on PrestaShop 1.7.8 to 9.x with PHP 7.1 to 8.5. The back office and the installer are translated into English, French, Spanish, German, Italian, Polish, Dutch and Portuguese.
Installation
- In Modules > Module Manager, click Upload a module and drop the
dfservermigration-2.0.1.zipfile. - Open Advanced Parameters > Server Migration.
Only super administrators can use the module: a package contains the whole database of the shop.
Step 1: checks
The first step analyses the shop and the server. The four tiles at the top show the files to copy, the database, the estimated package (compressed, with the worst case without compression) and the free disk space. A banner sums up the result: everything ready, points to watch or blocking points.
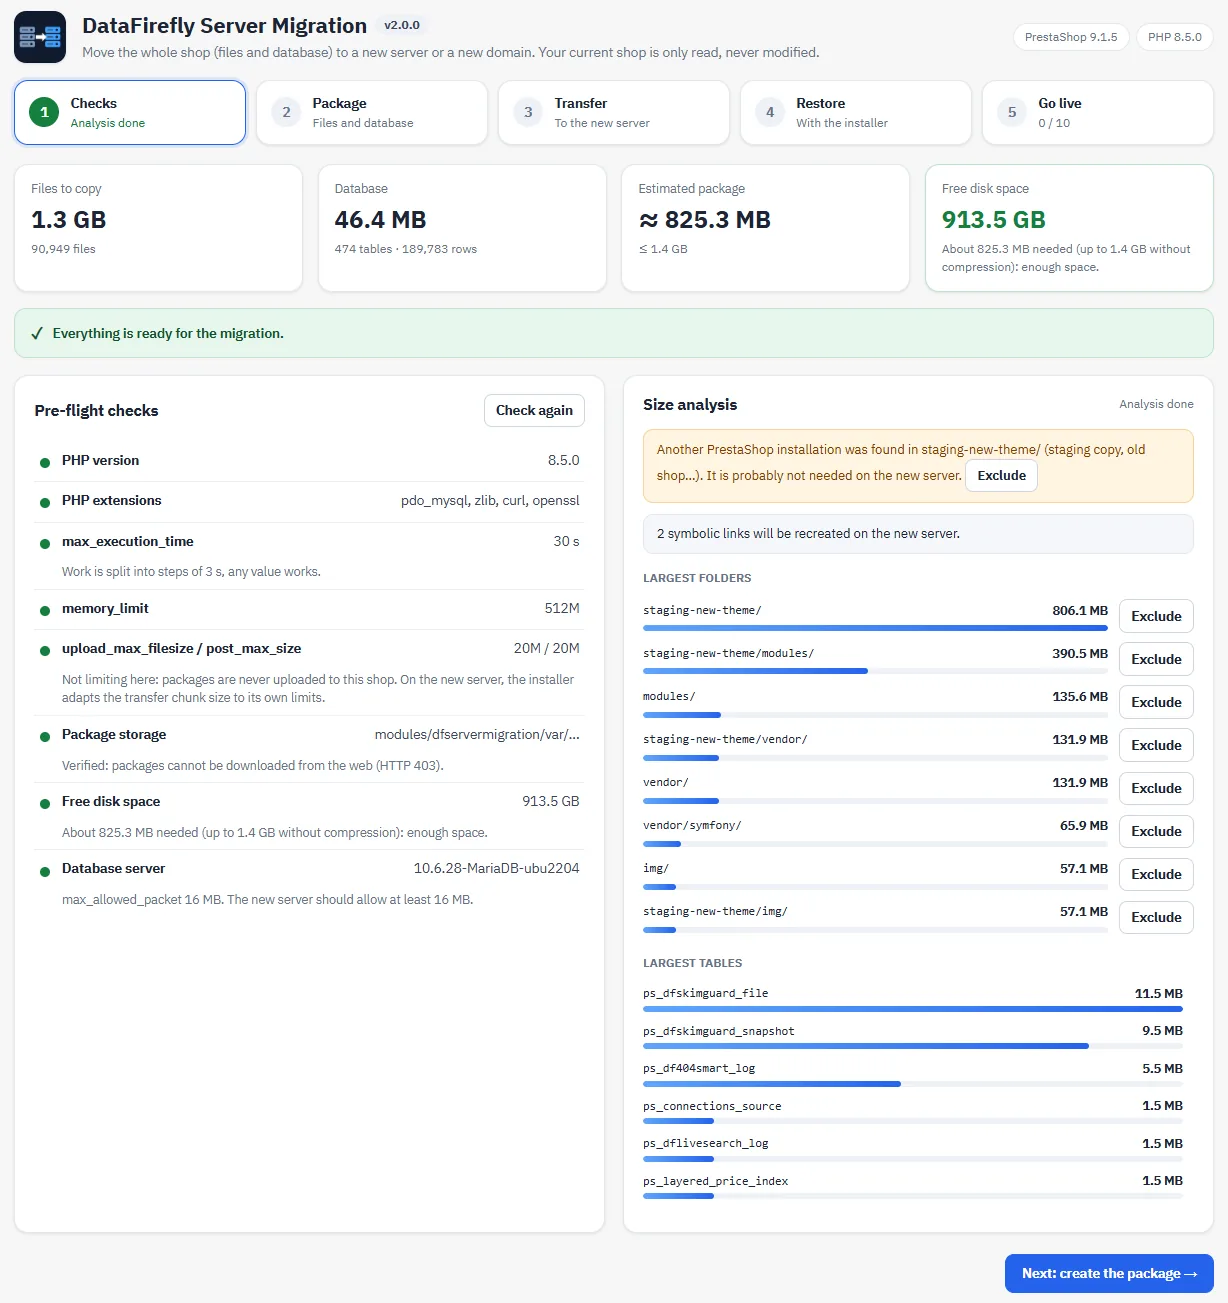
Pre-flight checks
- PHP version and extensions: pdo_mysql is required; zlib, cURL and OpenSSL are recommended (compression, direct transfer, encryption of the HTTP password).
- max_execution_time and memory_limit: the work is split into steps of a few seconds, so any time limit works.
- upload_max_filesize / post_max_size: not limiting on this shop. On the new server, the installer adapts the size of the transfer chunks to its own limits.
- Package storage: outside the web root when the hosting allows it. Otherwise a random folder with deny rules, and your browser checks that a package cannot be downloaded from the web.
- Free disk space: compared with the estimated package. If your host disables
disk_free_space(), a warning replaces the measure: check the space in your hosting panel. - Database server: version and max_allowed_packet.
Size analysis
The largest folders and tables are listed with an Exclude button. If another PrestaShop installation is found in a sub-folder (a staging copy, an old shop), a message suggests excluding it.
Step 2: the package
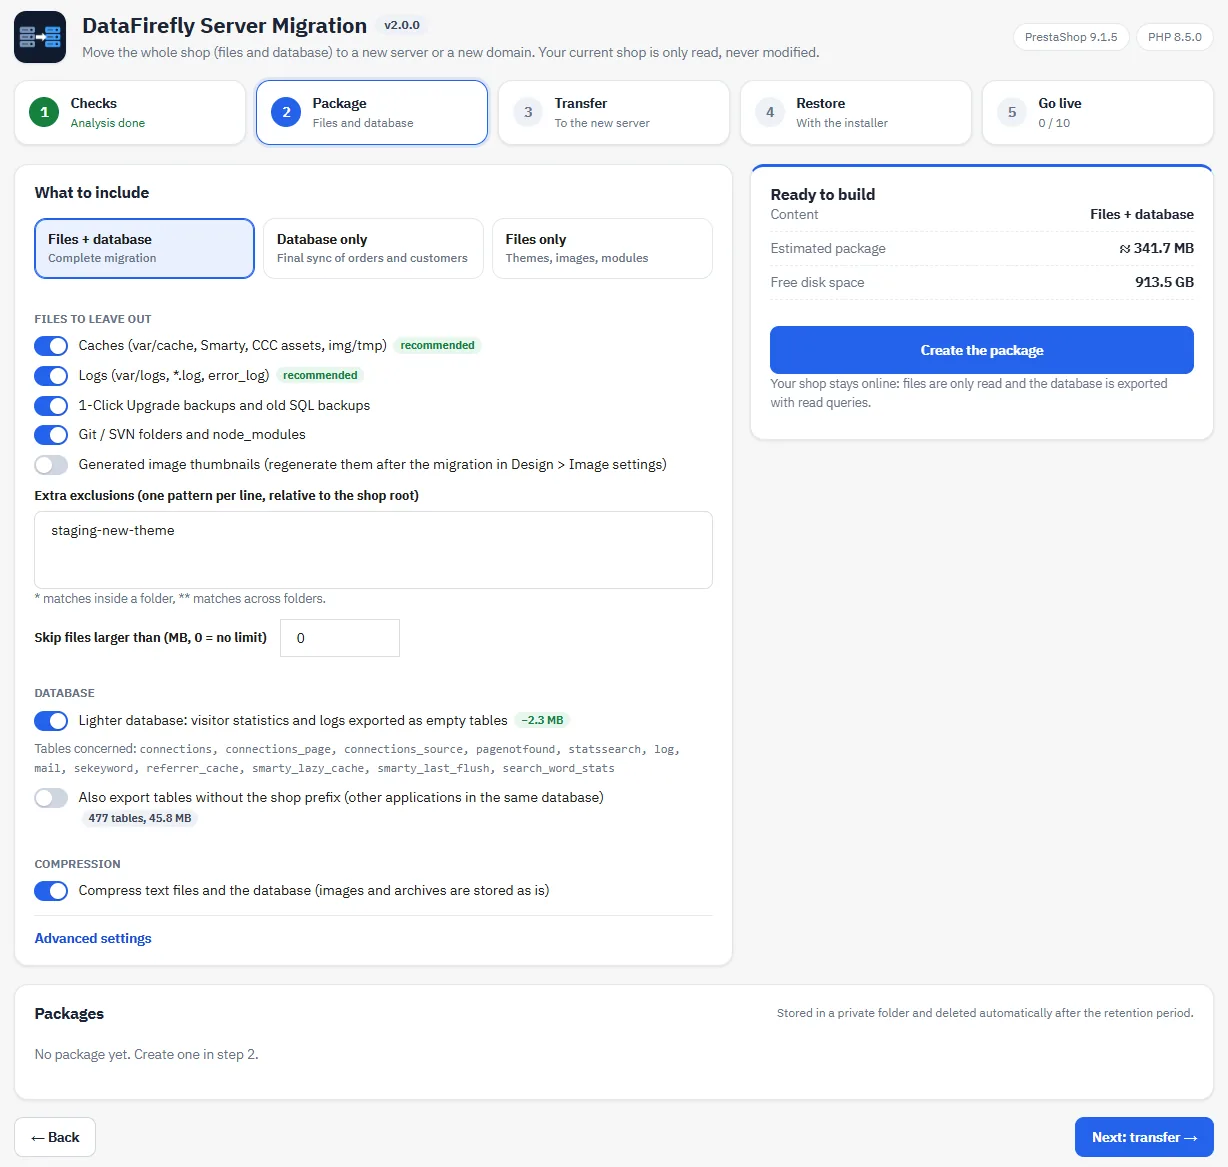
What to include
- Files + database: the complete migration.
- Database only: the final sync of orders and customers just before the switch.
- Files only: themes, images, modules.
Caches, logs, 1-Click Upgrade backups and Git folders are left out by default. You can also leave out generated thumbnails (regenerate them afterwards in Design > Image settings), add your own patterns (one per line, * inside a folder, ** across folders) and skip files above a given size. The Lighter database option exports visitor statistics and logs as empty tables.
Symbolic links: links pointing inside the shop are recreated as links. Links pointing outside the shop, for example an uploads folder stored elsewhere, are copied as real folders: the new server does not have their target. Broken links, loops and system folders are left out and listed in the report. You can turn this off with the option Copy the content of symbolic links pointing outside the shop.
Building the package
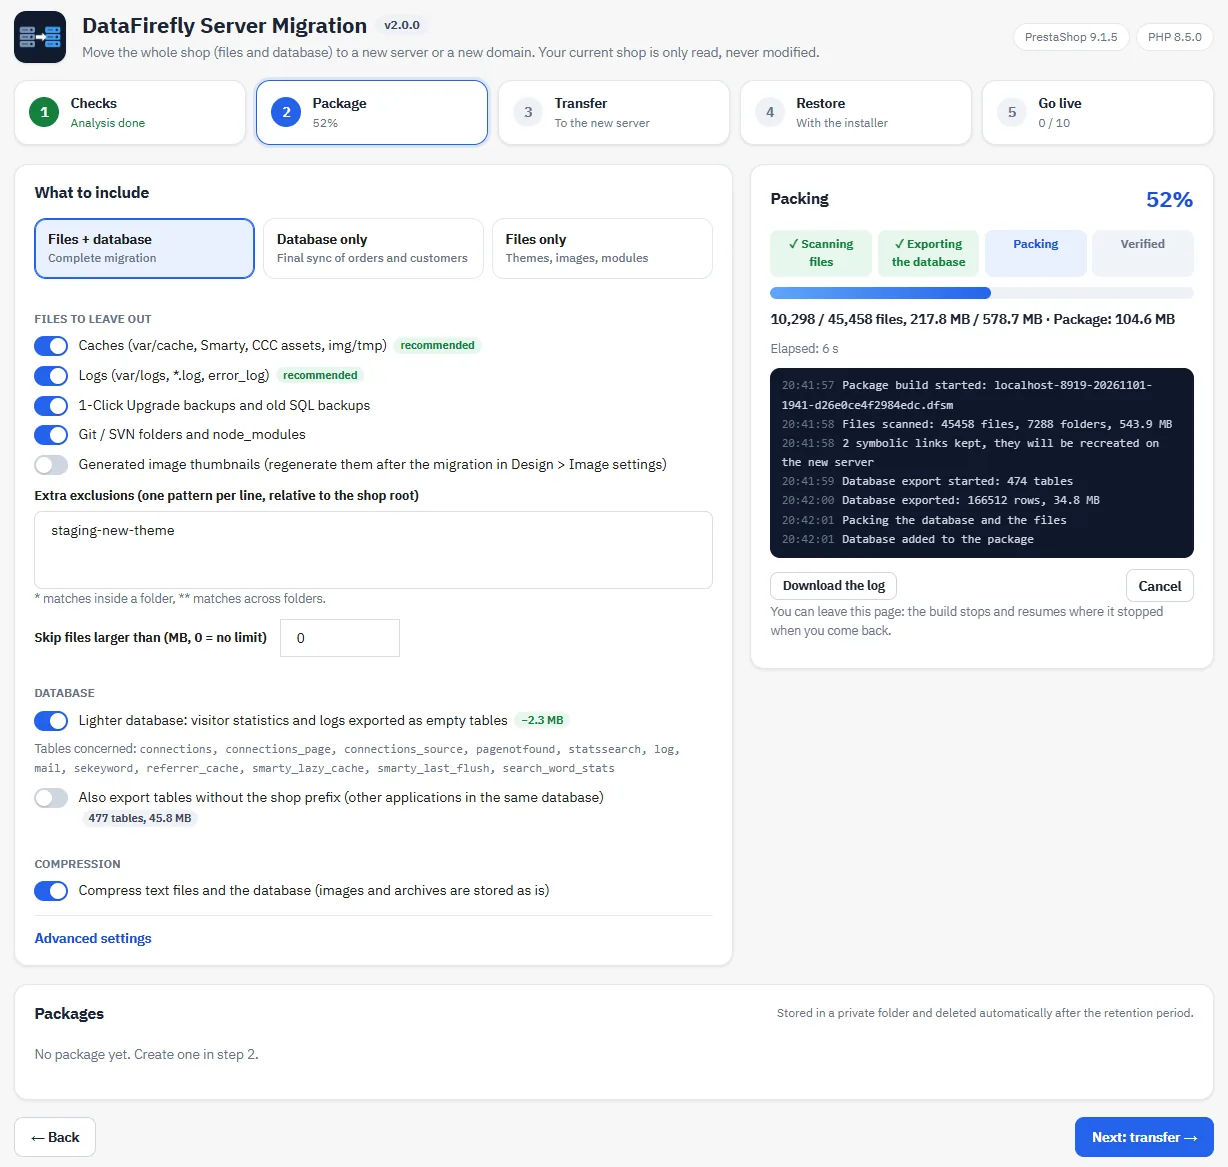
Click Create the package. The panel shows the stages (scan, database export, packing, verification), the counters, the speed, the remaining time and the log. You can leave the page: the build resumes where it stopped when you come back. The log can be downloaded at any time.
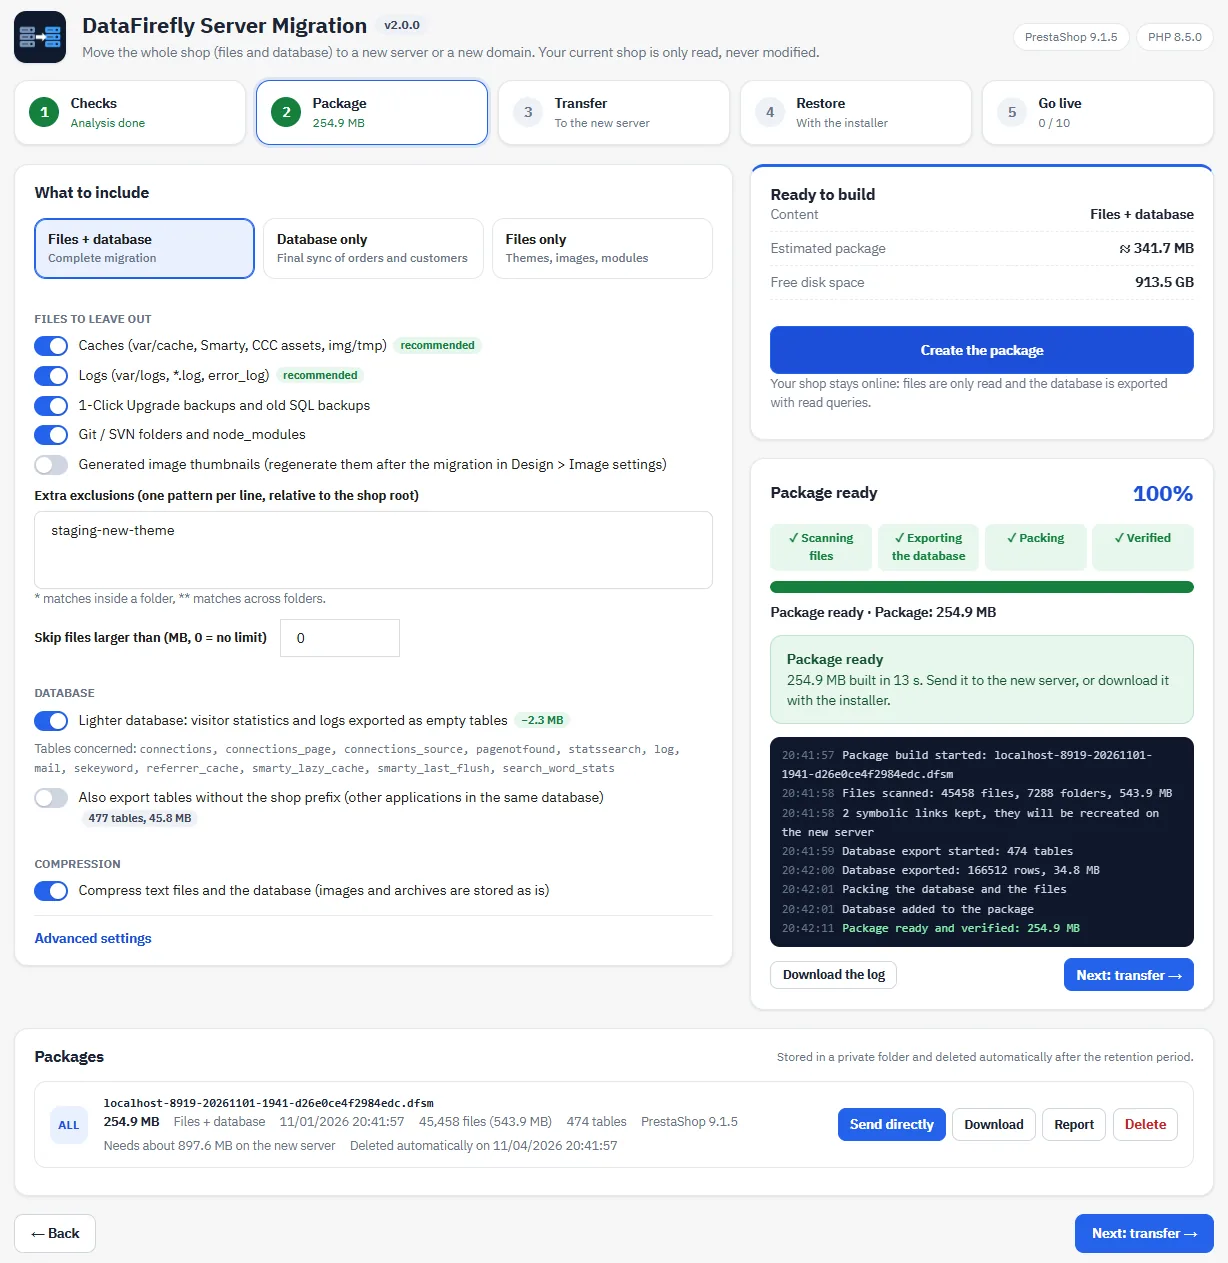
At the end, the package is verified and listed with its content, its size, the space it needs on the new server and its automatic deletion date (3 days by default, set in the advanced settings).
Disk space
Before starting, the module compares the free space with the estimated package. If it does not fit, the start is refused with the numbers and the fix. You can still start anyway: the build is protected.
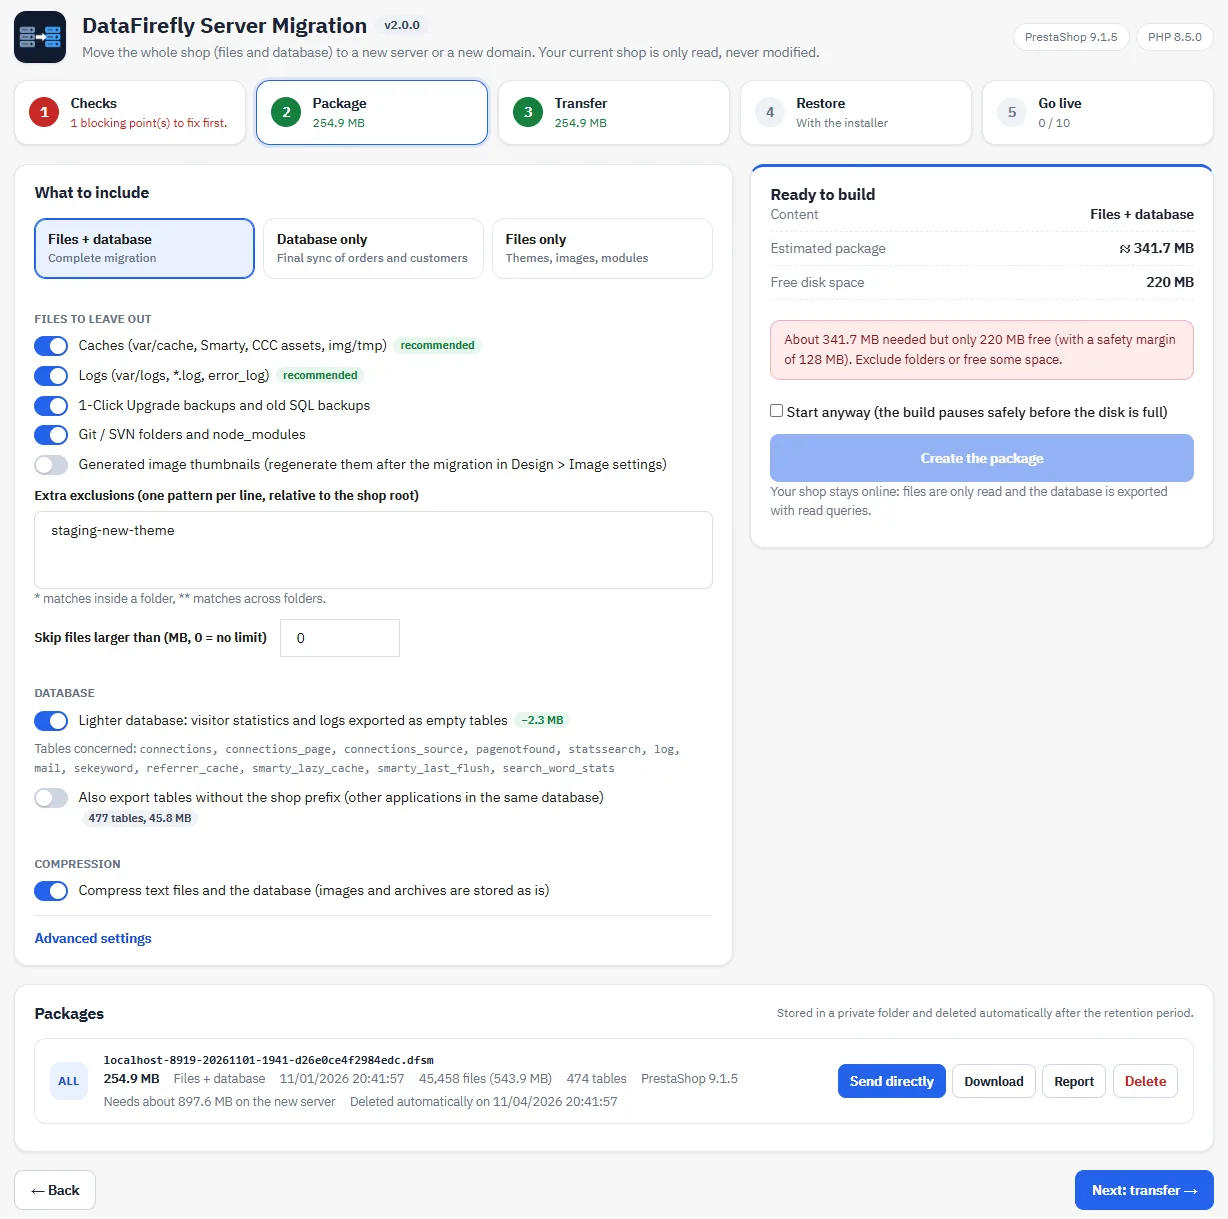
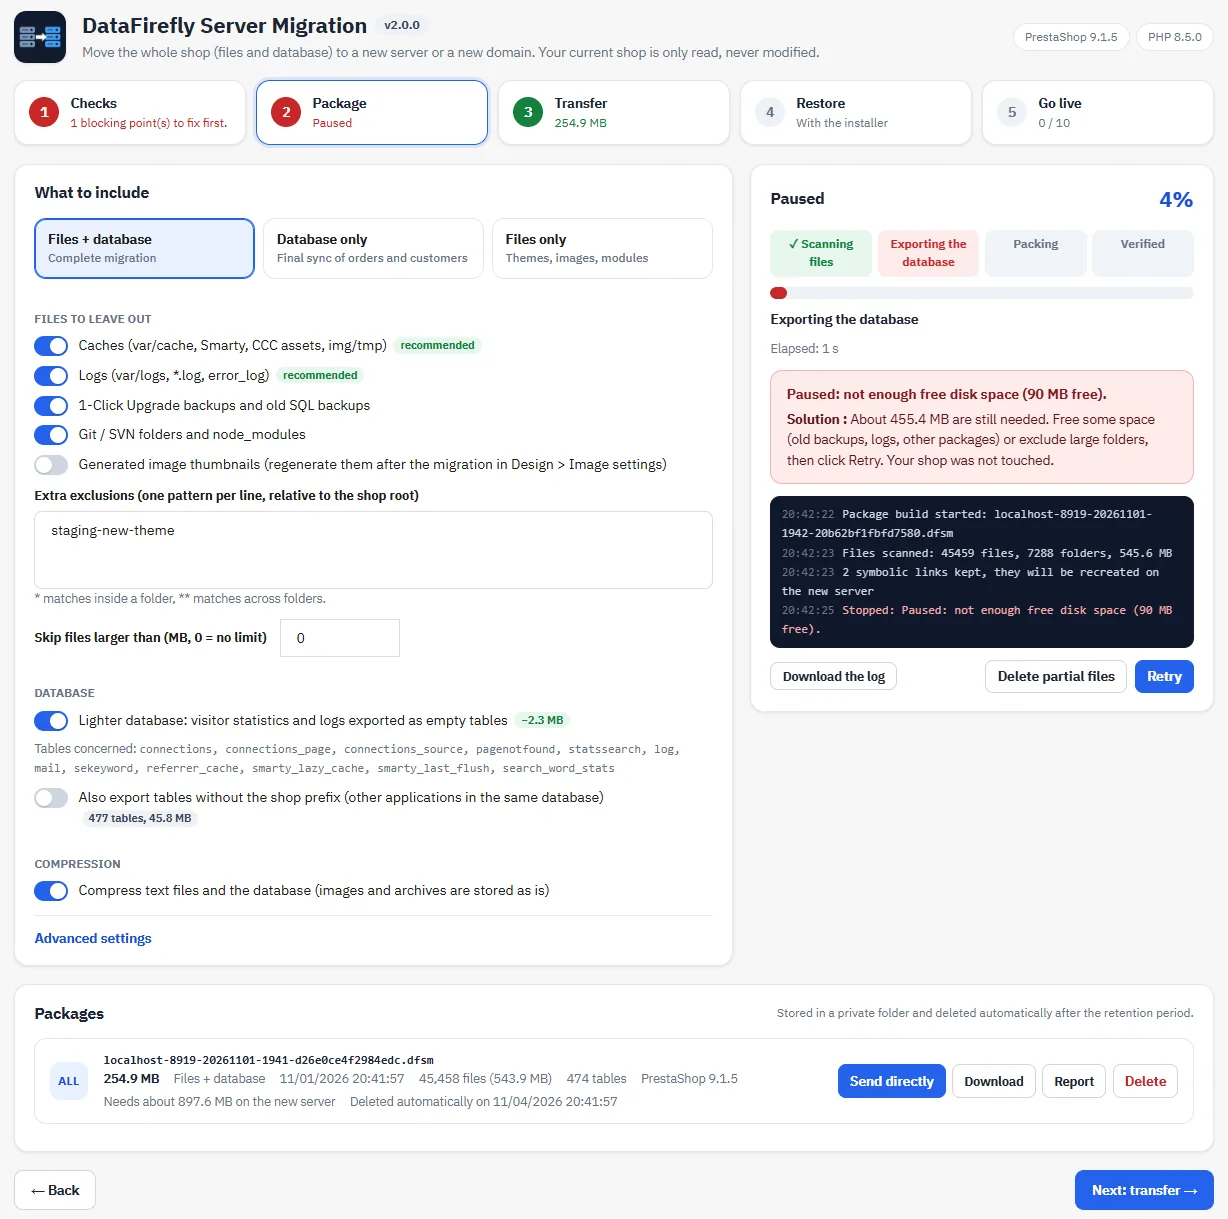
During the build, the module keeps at least 128 MB free so the live shop keeps working. If space runs short, the build pauses, shows how much is still needed and what to do. Free some space or exclude folders, then click Retry: the build resumes where it stopped. Delete partial files cancels it cleanly.
Step 3: transfer
Put the installer on the new server
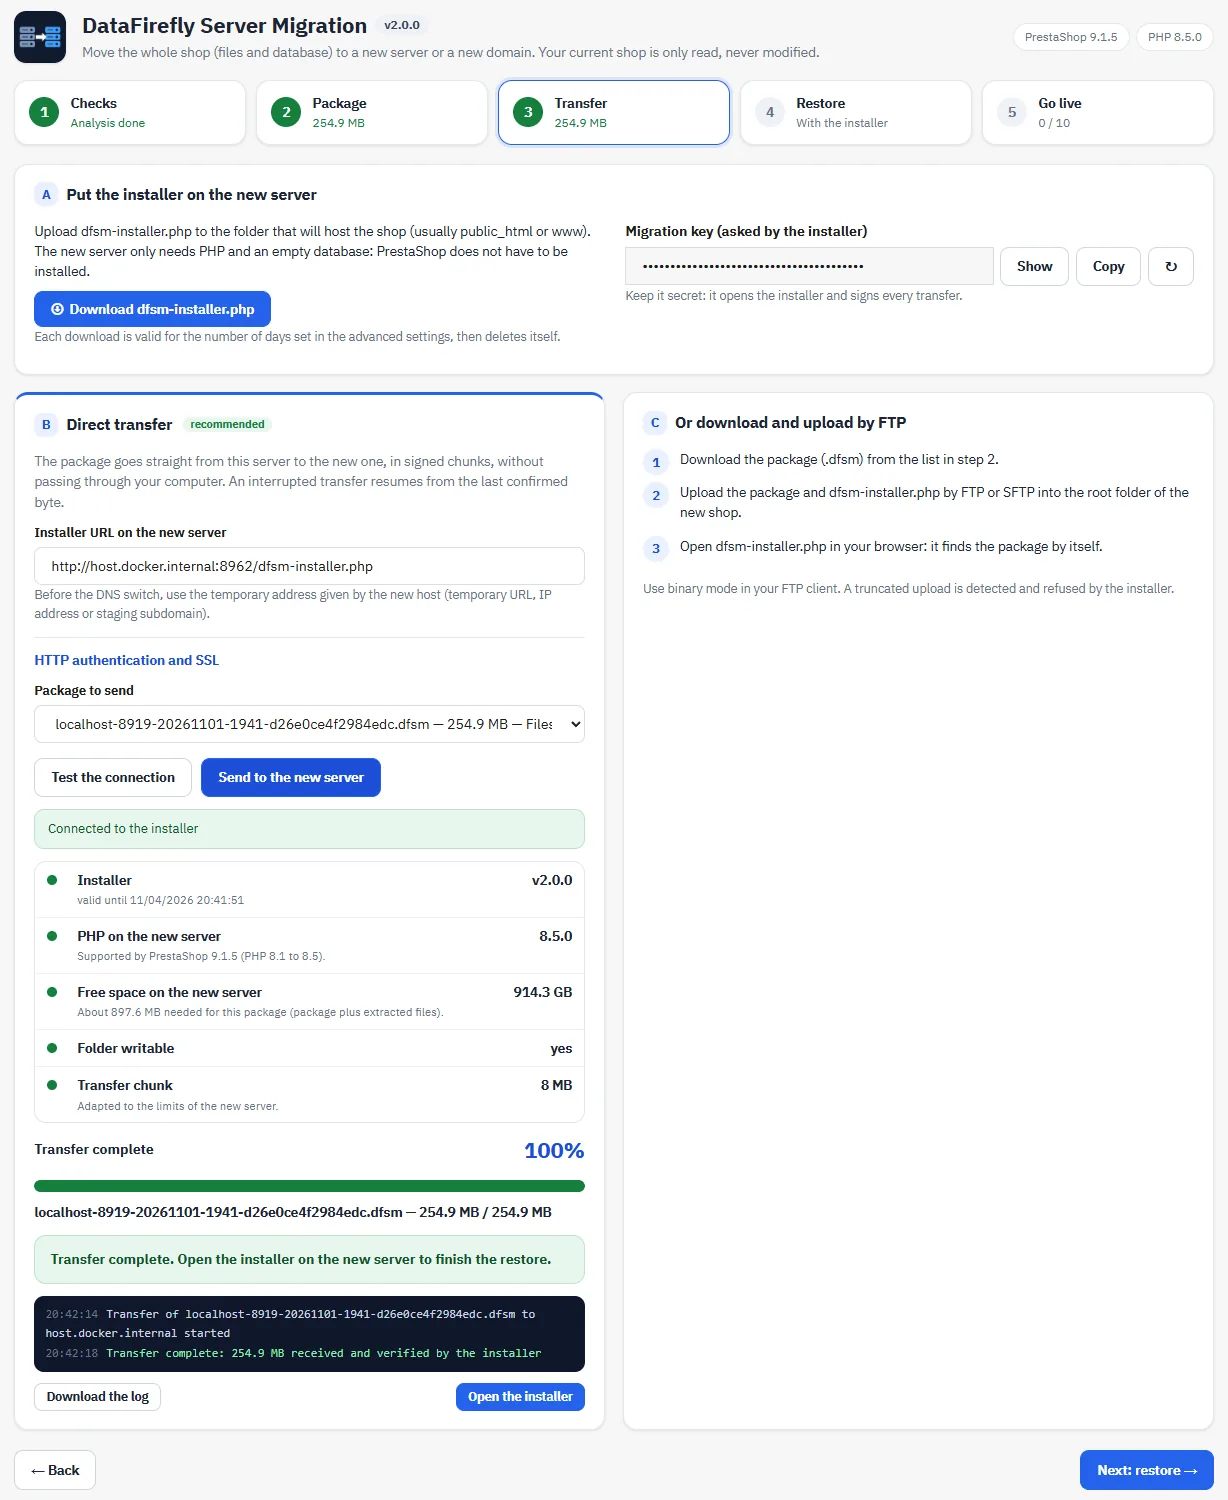
Download dfsm-installer.php and upload it to the folder that will host the shop (usually public_html or www). The new server needs PHP and an empty database, not PrestaShop. Each installer is valid for 3 days by default and is protected by the migration key shown next to the button.
Direct transfer (recommended)
- Enter the address of the installer on the new server. Before the DNS switch, use the temporary address given by the new host.
- Click Test the connection: the module checks the installer version, the PHP version for your PrestaShop version, the free space for this package and the write access.
- Choose the package and click Send to the new server.
The package travels in chunks signed with HMAC-SHA256. An interrupted transfer resumes from the last confirmed byte, and Stop deletes the partial file on the new server. For a protected folder or a server without a valid certificate, open HTTP authentication and SSL.
Download and upload by FTP
Download the package from the list and upload it next to dfsm-installer.php in binary mode. The installer finds it by itself and refuses a truncated file.
Step 4: restore with the installer
- Open
dfsm-installer.phpin your browser, choose your language and enter the migration key. - Choose the package received or uploaded.
- Check the new server: PHP compared with the versions supported by your PrestaShop version, extensions, free space compared with the package, write access, limits, existing site in the folder.
- Enter the new database and test the connection. The installer compares the server with the source, checks max_allowed_packet and counts the tables that already use the prefix.
- Check the domains: one line per shop URL with the new domain, the SSL domain and the base folder. You can also change the table prefix.
- Click Start the restore.
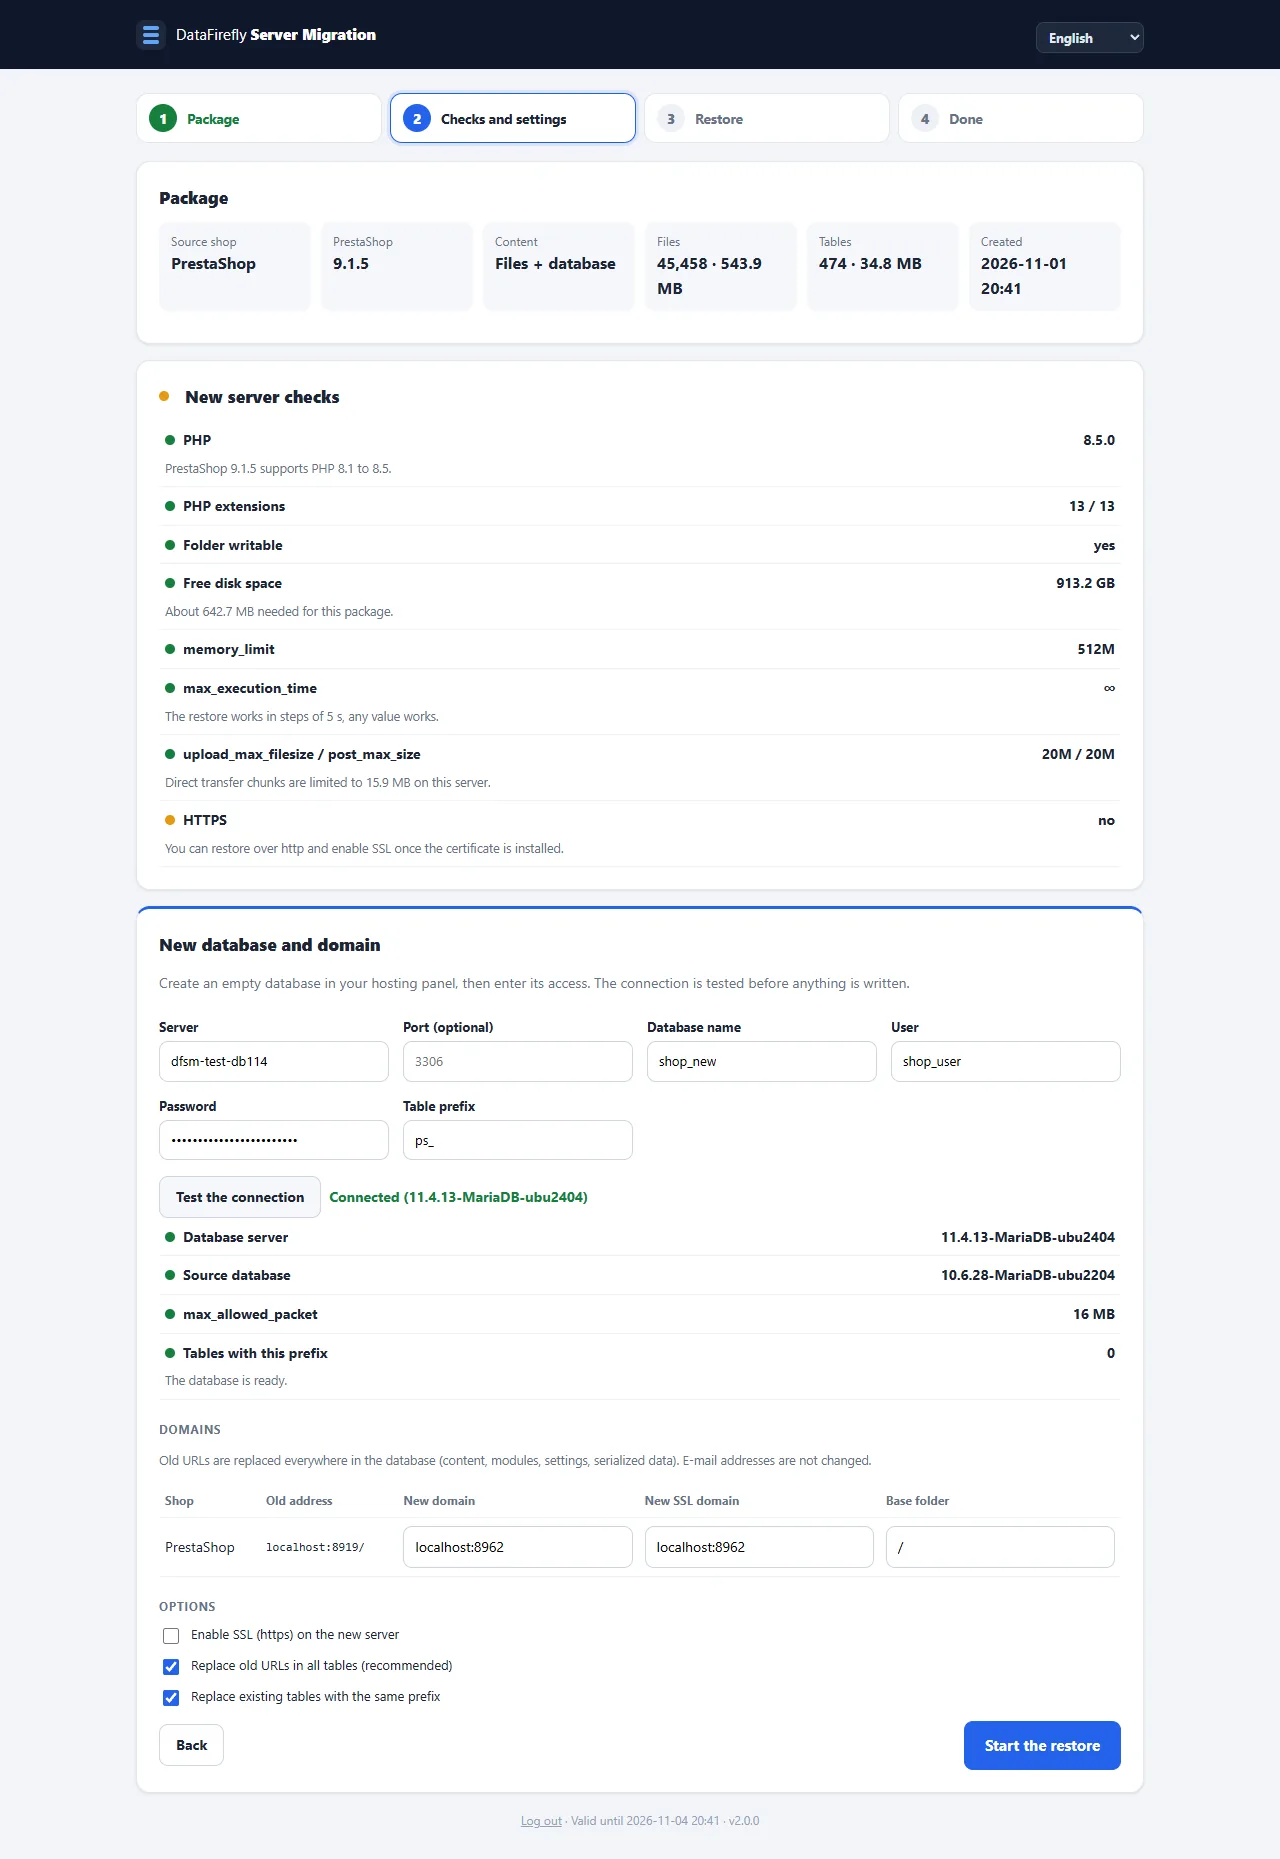
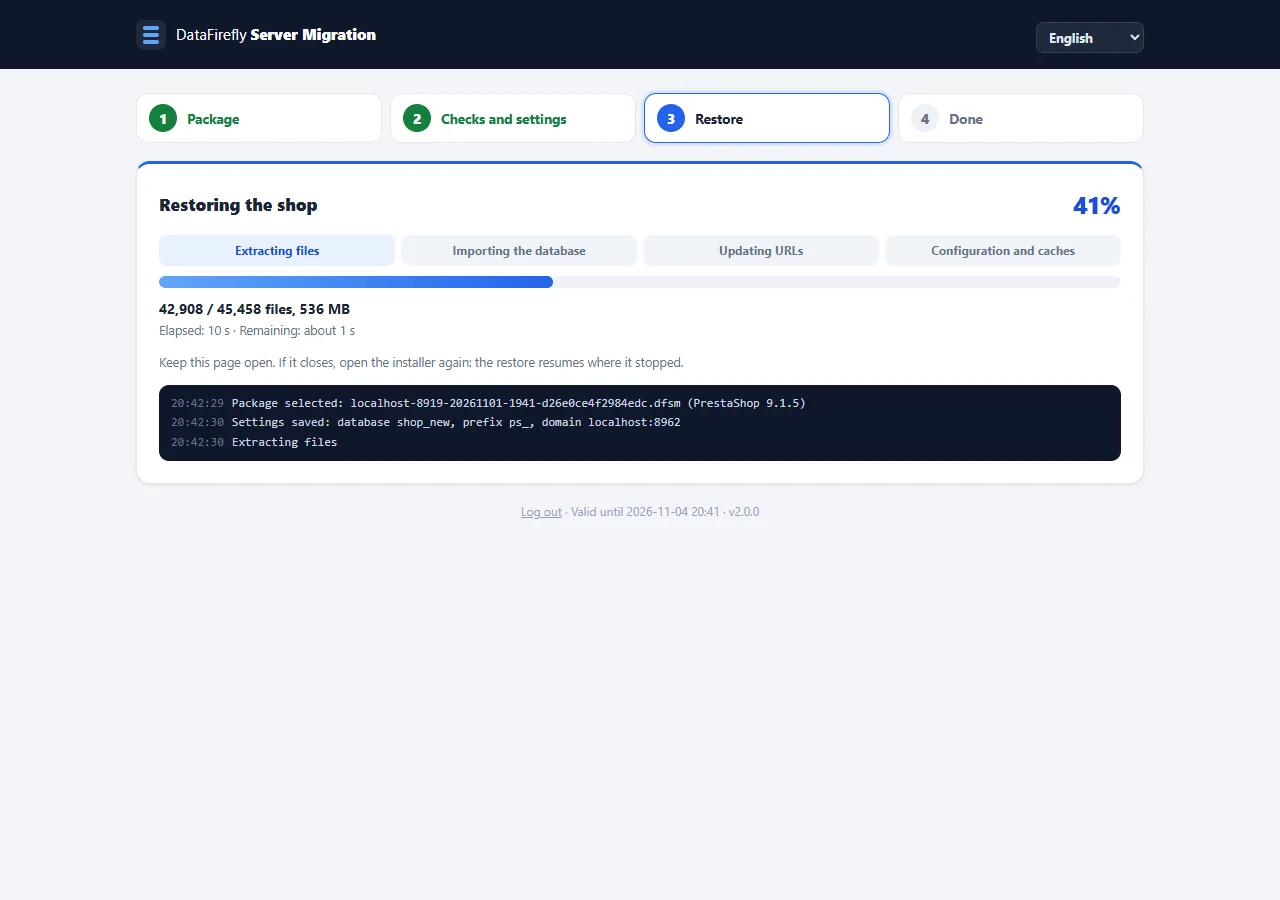
The restore extracts the files, recreates the symbolic links of PrestaShop 9, imports the database, updates ps_shop_url and the domain settings of each shop, replaces the old URLs in every table (serialized data included, e-mail addresses untouched), writes app/config/parameters.php, lets PrestaShop regenerate .htaccess and empties the caches. Keep the page open; if it closes, open the installer again and the restore resumes.
After the restore
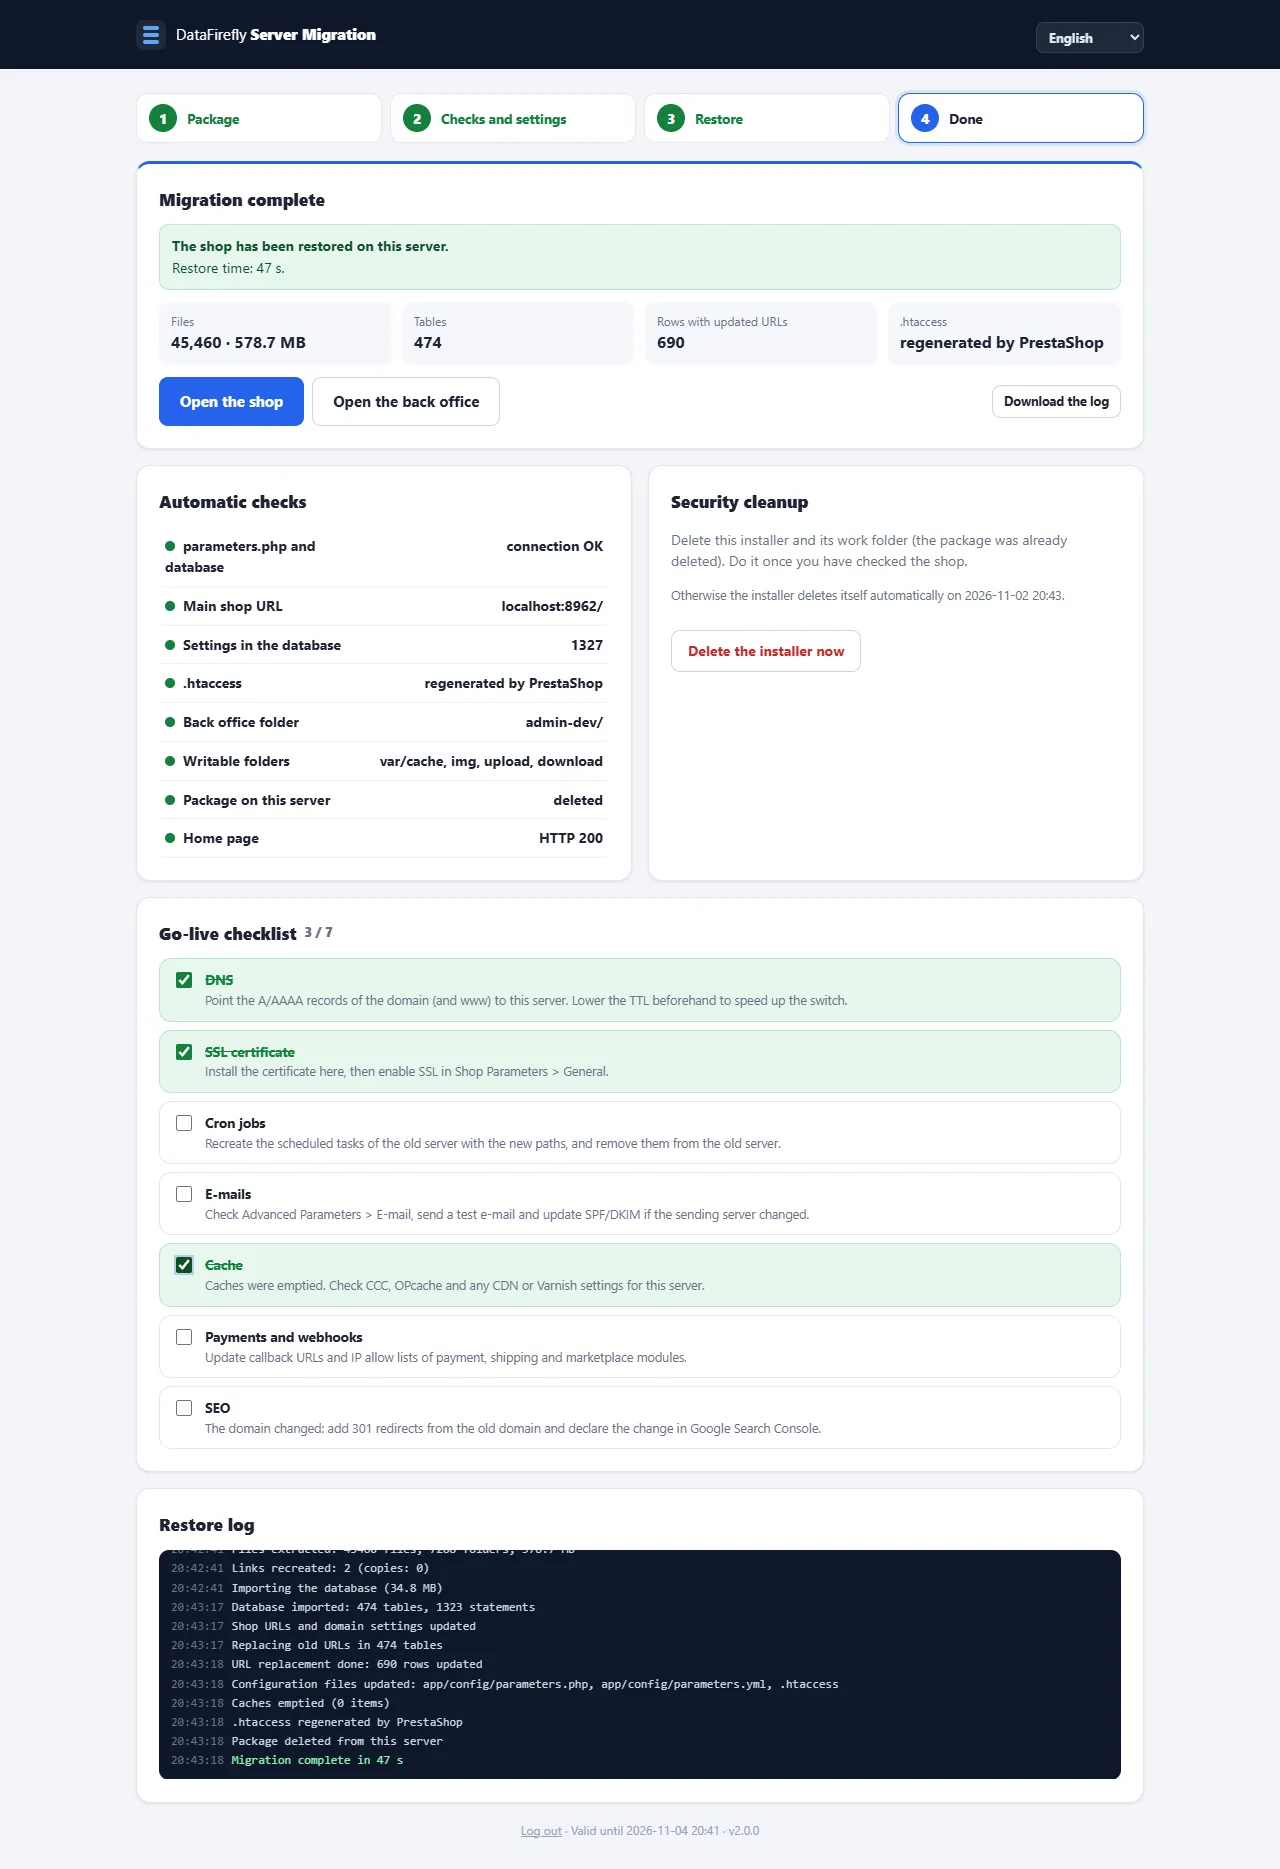
The last screen shows the figures of the restore, automatic checks (database connection, main shop URL, .htaccess, back office folder, writable folders, home page) and a go-live checklist. The package and the database password are already deleted from the server. Click Delete the installer now once you have checked the shop; otherwise it deletes itself 24 hours later.
Step 5: go live
The checklist of the back office keeps track of the last tasks: test the new shop, freeze the old one and sync the last data with a database-only package, DNS, SSL certificate, cron jobs, e-mails, cache, payment webhooks, SEO and cleanup.
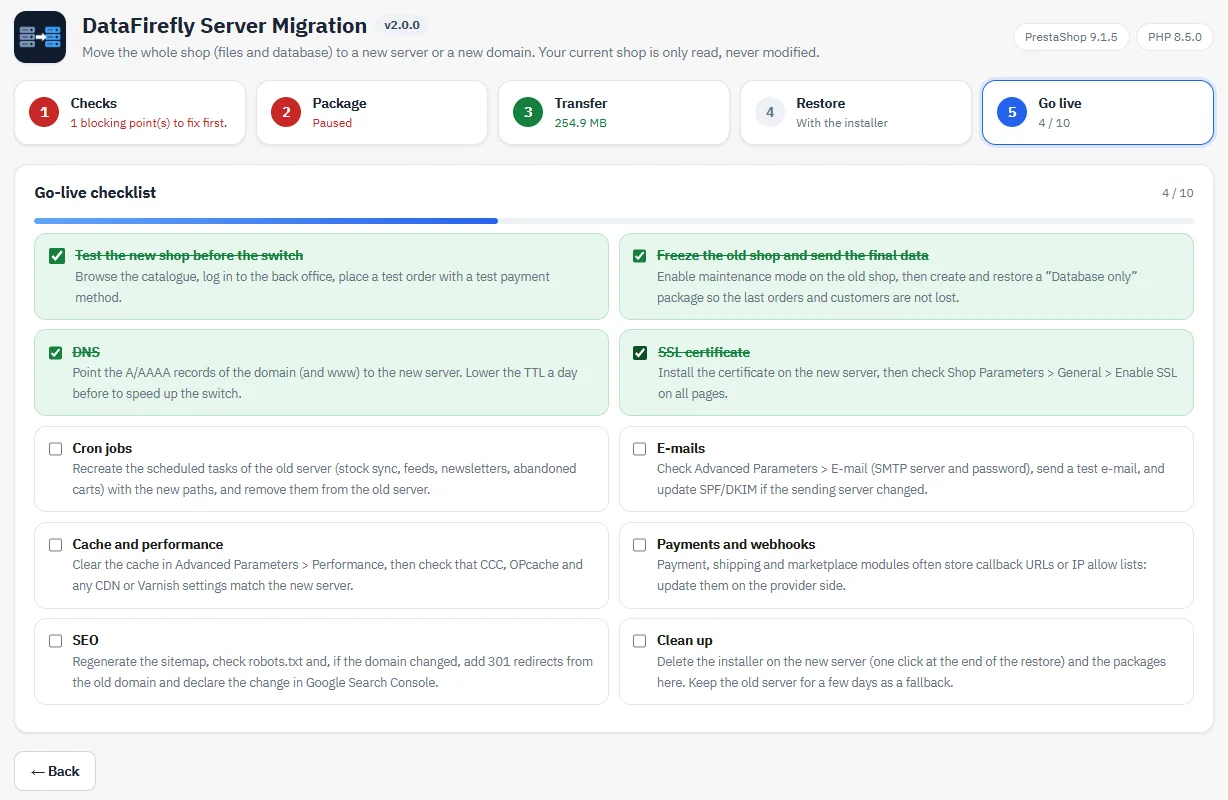
To lose no order: test the new shop, enable maintenance on the old one, create a Database only package and restore it with a new installer. The database access of the shop already restored is pre-filled; leave the password empty to keep it.
Security
- Packages are stored outside the web root when possible and deleted automatically after the retention period.
- The HTTP password of the new server is encrypted in the configuration.
- The installer requires the migration key, refuses unsigned requests, seals the database password and erases it at the end, then deletes itself 24 hours after the restore or when it expires.
- New key in step 3 invalidates every installer downloaded before.
Troubleshooting
Packages CAN be downloaded from the web
Your server ignores .htaccess (Nginx). Add a rule denying access to /modules/dfservermigration/var/ before creating a package.
The new server refuses the connection or asks for a login
Check the address of the installer (http or https, www). For HTTP 401, fill in the HTTP authentication fields. For HTTP 413, lower the transfer chunk size in the advanced settings.
The installer rejected the migration key
A new key was generated since the installer was downloaded, or the clocks of both servers differ by more than 15 minutes. Download the installer again.
SQL error during the import
The installer shows the table and the detail. For max_allowed_packet, ask your host to raise it to 16 MB or more and click Retry: the current table is imported again.
.htaccess could not be regenerated
The domain was updated in it anyway. Save Shop Parameters > Traffic & SEO once in the new back office.