
DataFirefly Custom Textile Printing: custom apparel printing for PrestaShop
Installation, Getting started tab, price grids, placements, product rules, 4-step designer, share links, proofs, production tracking and troubleshooting.
Overview
The module adds custom apparel printing to the products you choose. On the product page, a card shows the starting price per piece; the Customise button opens a full-screen designer in four steps: colour and sizes, placements, artwork and text, review. The shop recalculates the price before the item is added to the cart, then the print details follow the order through to the invoice thanks to PrestaShop’s native customization. After ordering, a status-based workflow handles artwork upload, proof approval and production.
Compatibility
- PrestaShop 1.7.8.0 to 9.x, with the same ZIP. Versions older than 1.7.8 are not supported.
- Tested on PrestaShop 1.7.8.11 (PHP 7.4, Classic theme), 8.2.1 (PHP 8.1, Classic) and 9.1.5 (PHP 8.5, Hummingbird).
- No Composer library and no external service. The four designer fonts (Montserrat, Bebas Neue, Playfair Display, Great Vibes) are bundled under the SIL Open Font License.
Installation
- In Modules > Module Manager, click Upload a module and send the
dftextileprintZIP. - The module creates its tables, a hidden product
DF-TEXTILE-SETUPthat carries the setup fees, and a menu entry under Catalog. - No demo data is forced on you. In the Getting started tab, the Use the starter grid button adds 4 techniques and 6 placements that you then adjust to your prices; another button removes them.
Do not delete the DF-TEXTILE-SETUP product. If it is missing or disabled, the Getting started tab says so and the module recreates it when you save the settings.
Upgrading from version 1.5
Upload the 2.0.0 ZIP over the installed version, without uninstalling. Ordered print jobs, open carts, customer files and your settings are kept: we checked it ZIP to ZIP on a PrestaShop 8.2 shop. New settings are only added when missing. If the setup fee product used a deleted tax group or one without rules, the upgrade switches it to a valid group and writes the change to the PrestaShop log. Then clear the cache in Advanced Parameters > Performance.
Getting started tab
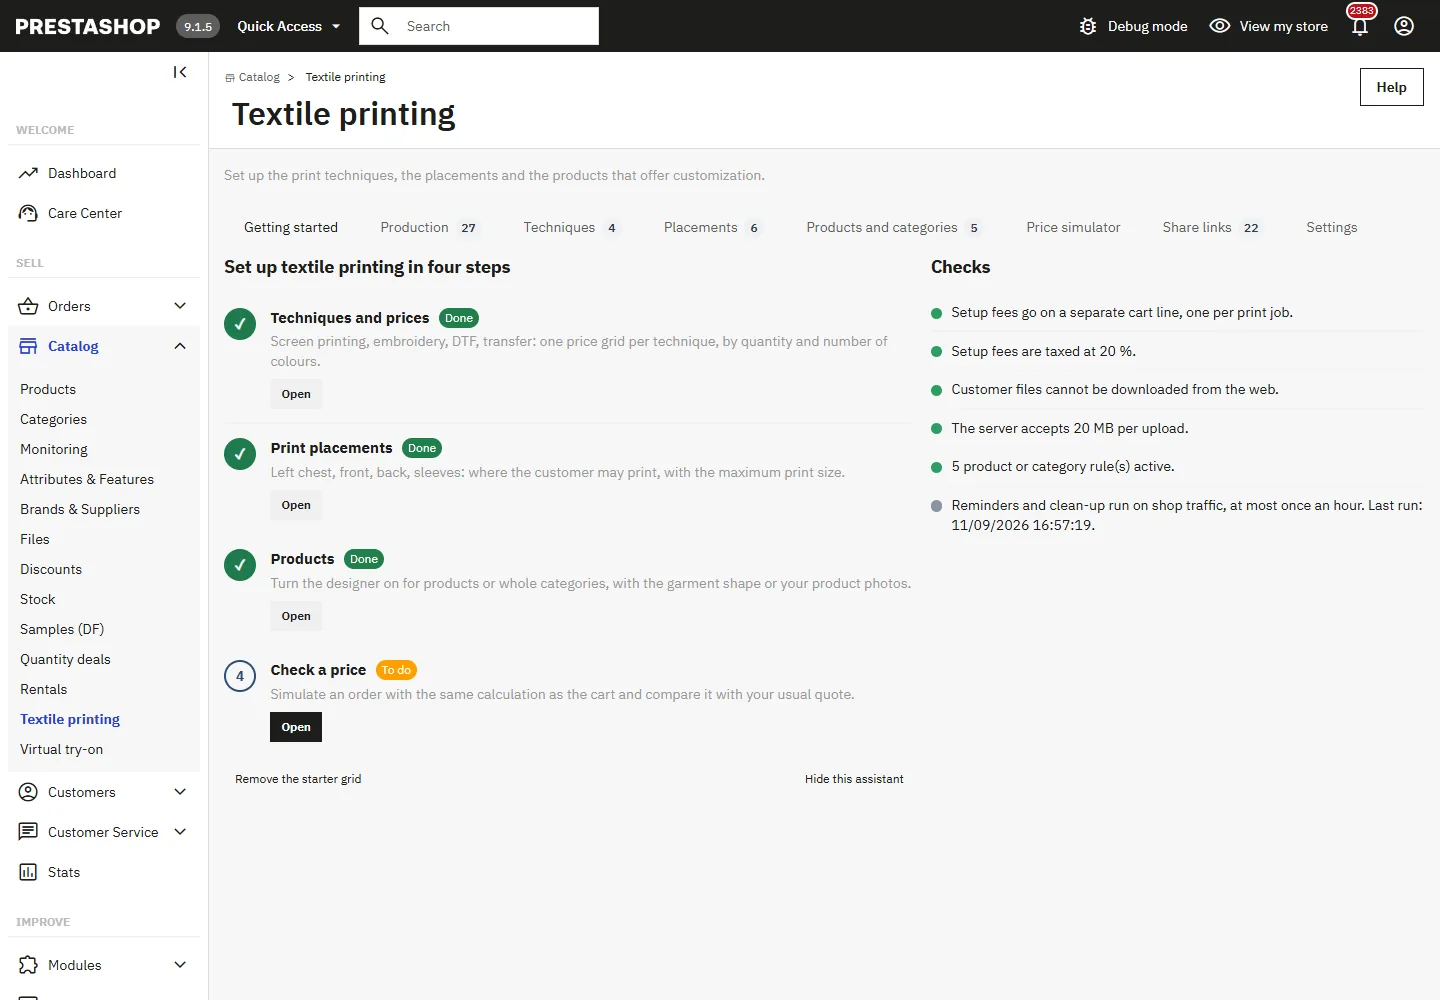
The assistant has four steps: Techniques and prices, Print placements, Products, Check a price. Each one switches to “Done” once filled in. Below the assistant, the Checks verify:
- the tax on setup fees: a tax group with no valid rule for your default country is flagged, because the fees would be invoiced without tax;
- the protection of the
/upload/dftextileprint/folder: on nginx, add the rule given in the message; - the maximum upload size accepted by the server;
- that at least one product or category rule exists, and that the setup fee product is present;
- when the automatic tasks last ran.
Techniques and price grids
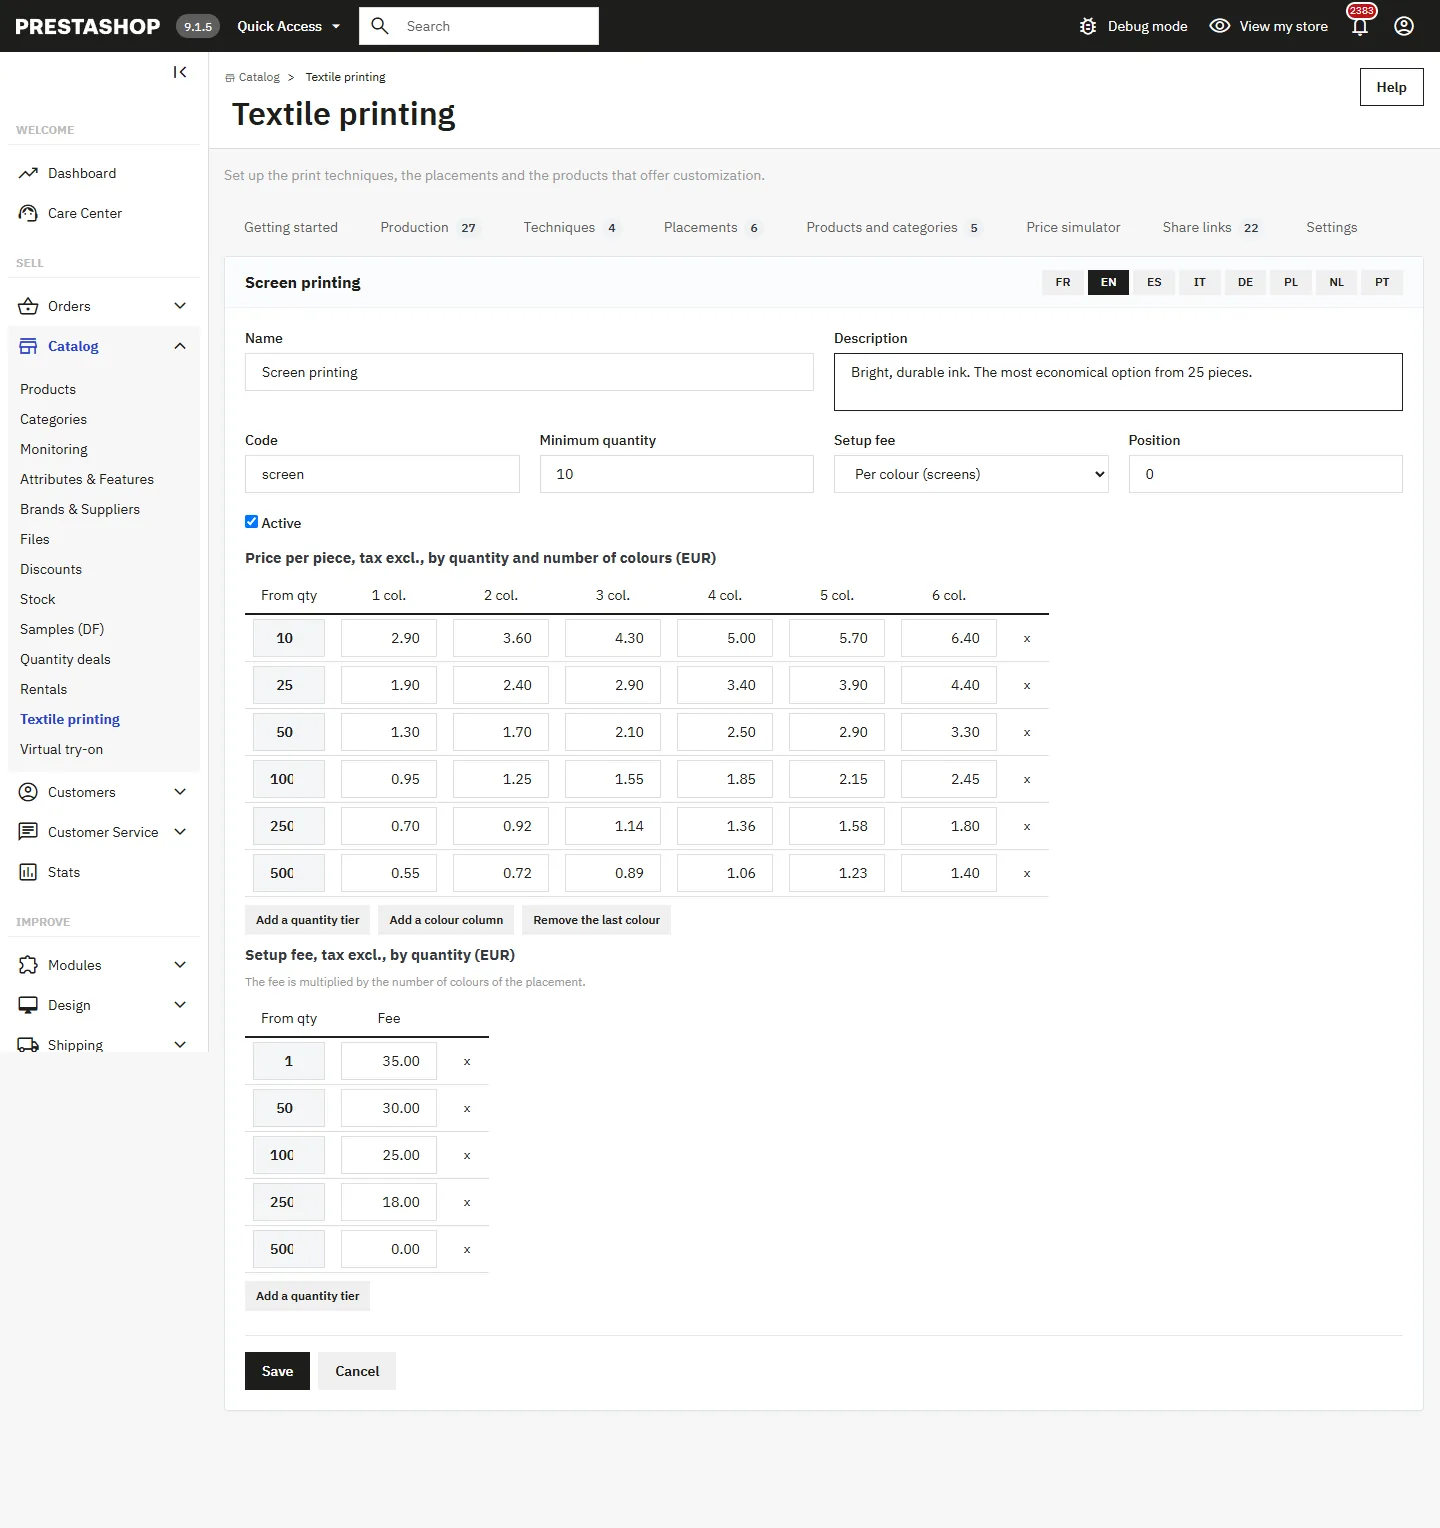
Each technique has:
- a price grid per piece, excluding tax: one row per quantity tier (“from 10”, “from 25″…) and one column per number of colours;
- a minimum quantity (for example 10 pieces for screen printing);
- a setup fee mode: per colour (screen printing screens), per design (embroidery programming, cutting file) or none (DTF transfer);
- a setup fee grid that decreases with quantity.
The quantity used is the total of all sizes and colours of the product in the print job. Prices are entered excluding tax in the default currency; PrestaShop converts them and applies the product’s tax.
Placements
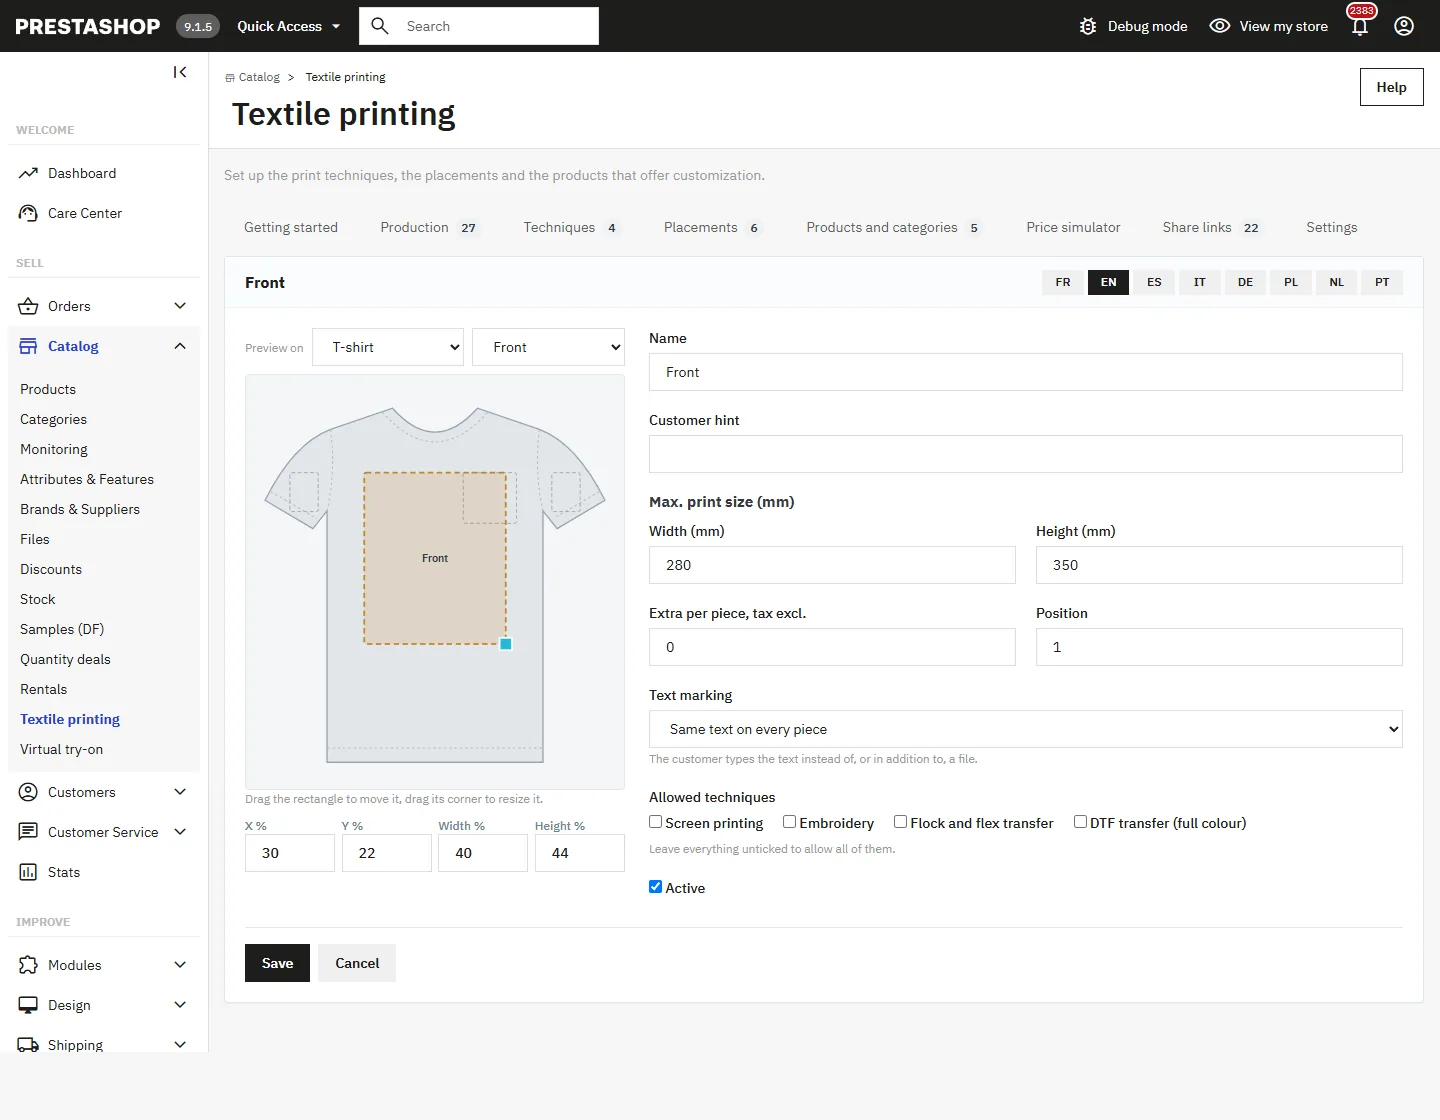
A placement has a name, a side (front or back), a position on the preview, a maximum print size in millimetres, an optional extra charge per piece and the list of allowed techniques (none ticked means all). Place it with the mouse in the editor: drag the rectangle, and its corner to resize it.
The Text printing option lets customers enter the same text on every piece or one line per piece (names and numbers), instead of a file or in addition to it.
Products and categories
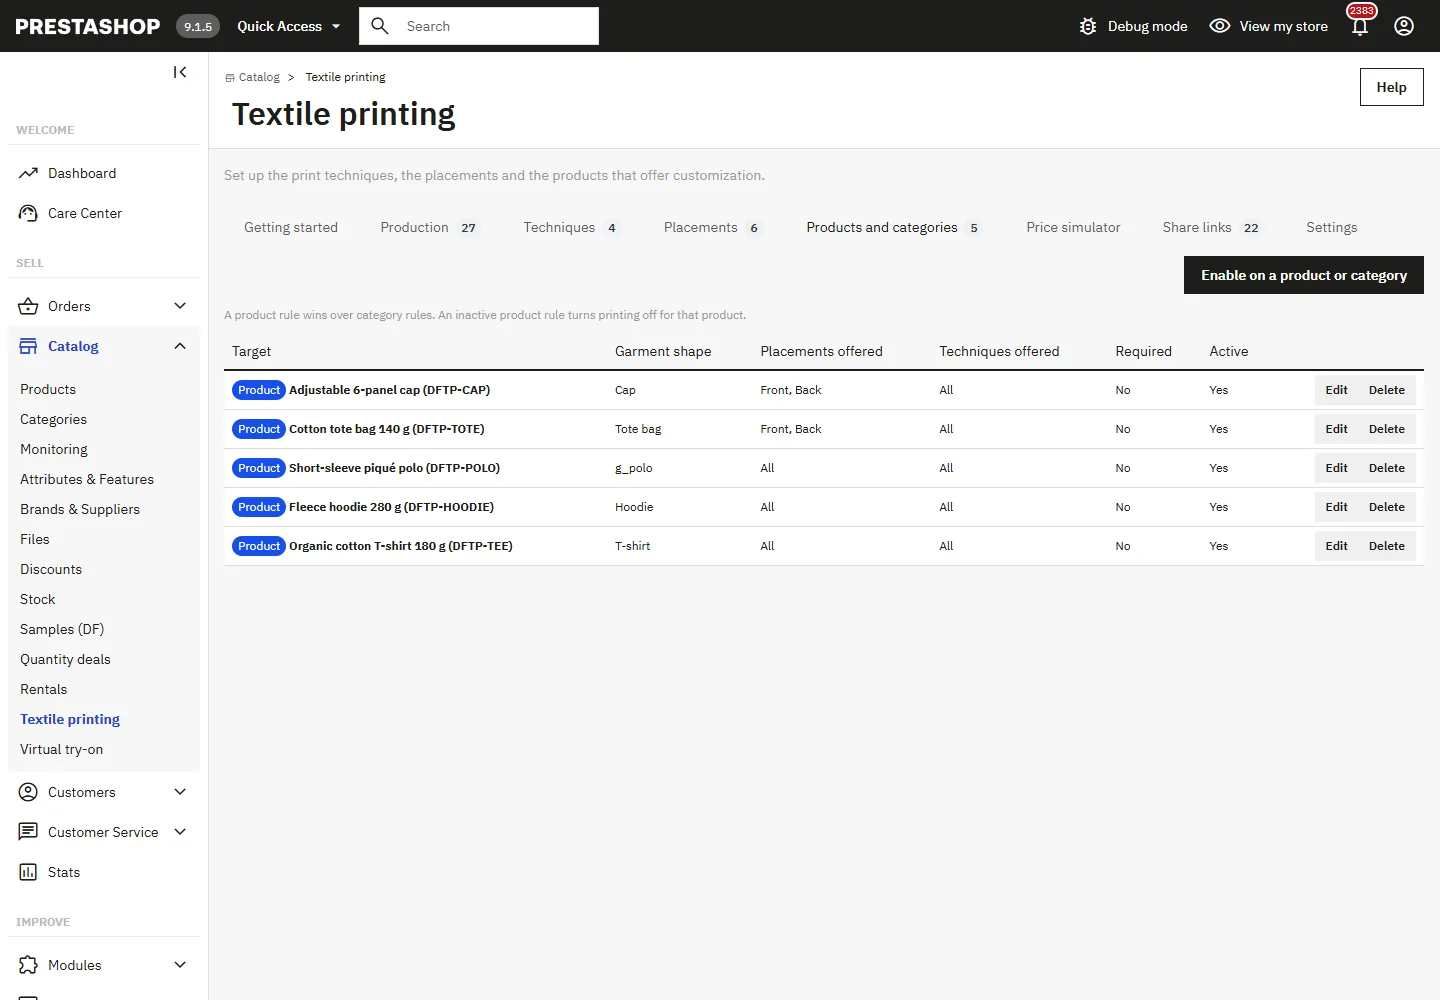
Turn printing on with rules, for a product or a category. A product rule takes priority over category rules, and an inactive product rule turns printing off for that product. For each rule:
- Garment shape: t-shirt, polo, hoodie, tote bag or cap;
- Printing required: hides the native add to cart button, so customers have to go through the designer;
- Placements and techniques offered: narrow the list if needed;
- Preview: outline tinted in the combination colour, or product photos.
In photo mode, enter the position of the front photo and of the back photo in the product’s image order (0 keeps the outline for the back). Images linked to a combination come first. Then place each zone on the photo; for a category rule, pick a sample product photographed like the others.
Price simulator
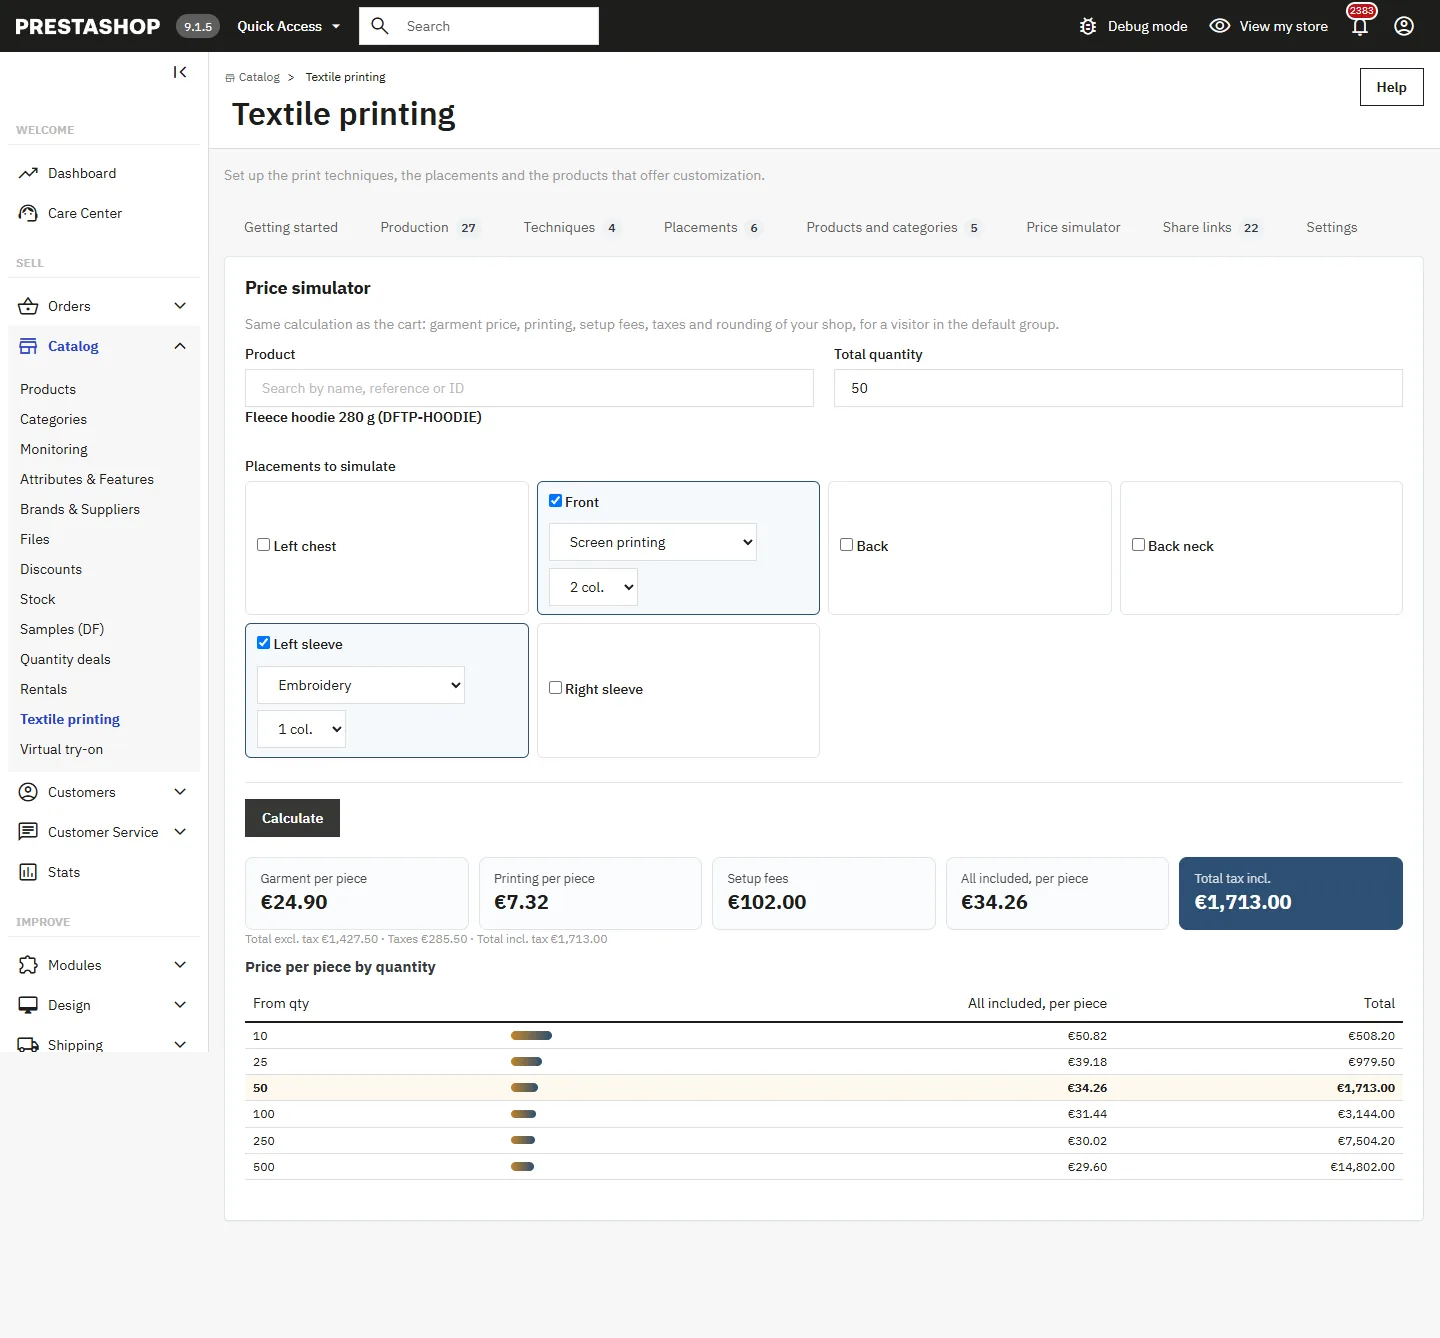
The Price simulator tab runs the same calculation as the cart for a visitor in the default group: garment price, printing, setup fees, tax and rounding of your shop. Choose a product, a quantity and the placements to simulate: the detail per piece is shown with the curve of the price per piece by quantity. Compare it with your usual quotes before opening printing to your customers.
Settings
- Setup fees in the cart: separate line (one per print job, locked to one unit) or spread into the price per piece. The choice applies to new print jobs.
- Tax rule for setup fees: on installation, the module only picks a group that actually taxes your default country.
- Size attribute group: automatic detection looks for the group name in every shop language (Size, Taille, Talla, Größe, Taglia, Rozmiar, Maat, Tamanho…). Choose it manually if detection fails.
- Maximum file size and accepted types, capped by the server’s PHP configuration.
- File required: without this option, customers can order and upload their file later.
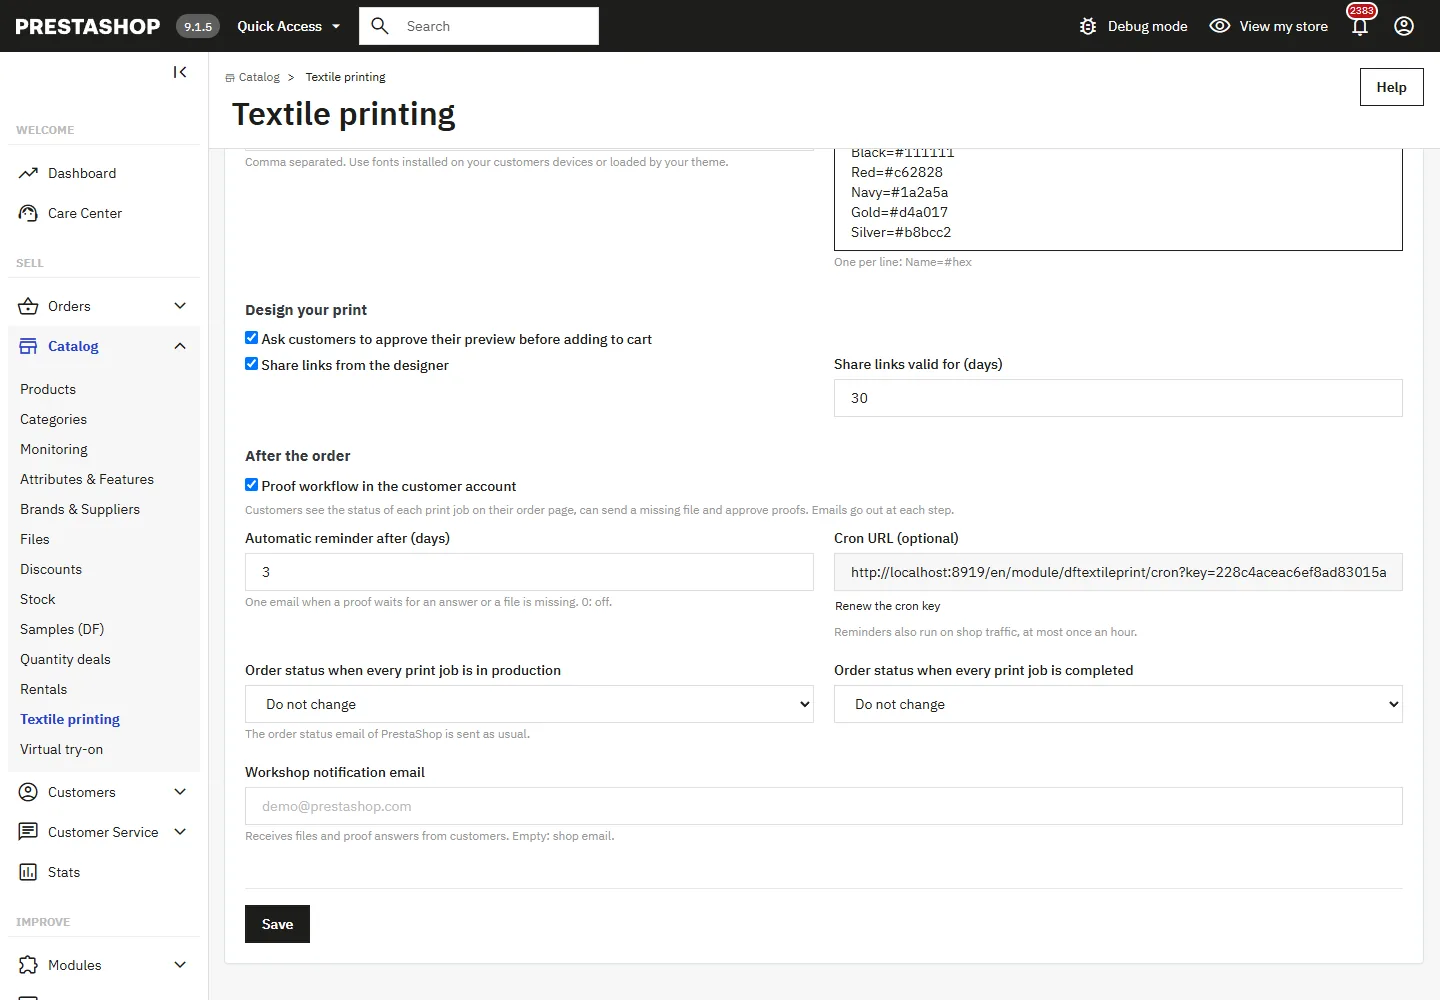
- Preview approval: customers tick a box at the Review step before they can add to cart.
- Share links: on or off, and validity period (30 days by default).
- Text printing: fonts offered and text colours (one per line, as Name=#hex).
- After ordering: tracking and proofs in the customer account, reminder delay, automatic order statuses, workshop notification email, cron URL and a button to renew its key.
The customer journey
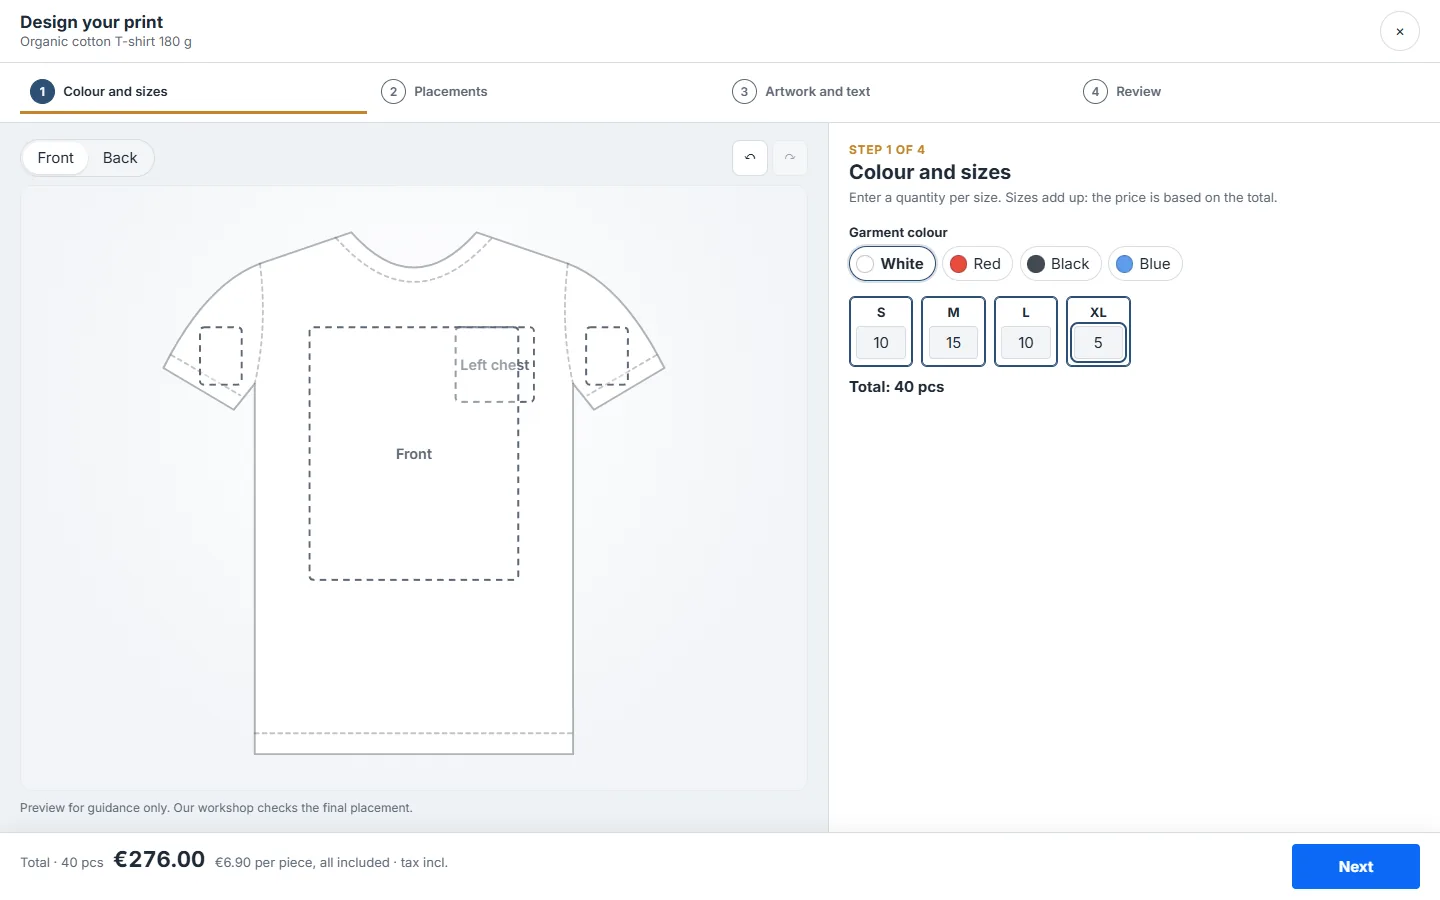
- Colour and sizes: the customer picks the garment colour and enters quantities per size; the total updates live.
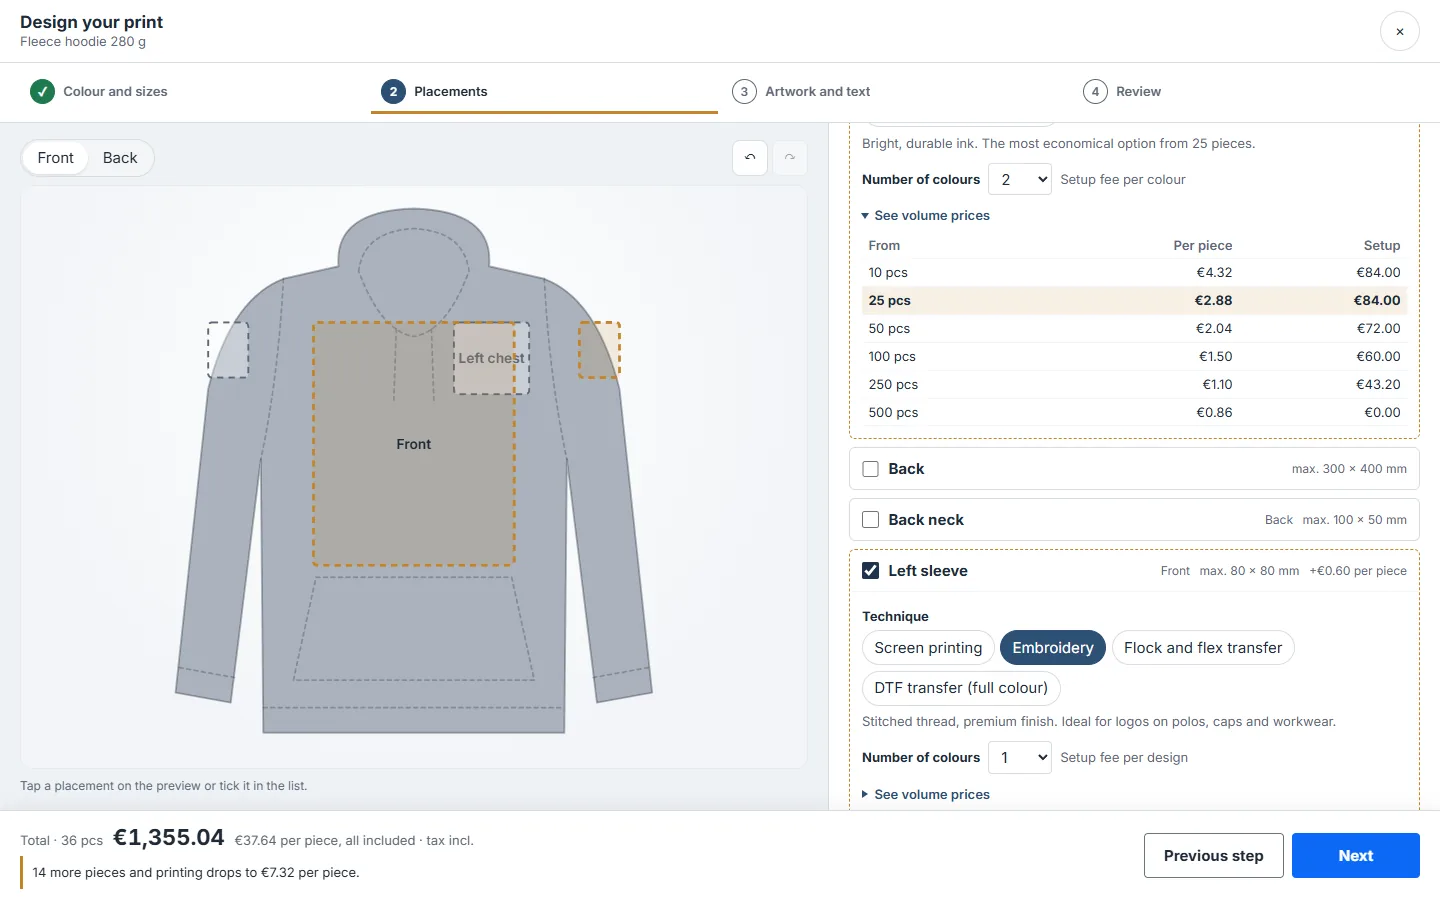
- Placements: they tick one or more placements, choose the technique and colour count, and can open the price table by quantity.
- Artwork and text: they upload a file or type their text, place and resize the logo on the preview (mouse, keyboard, finger or pinch on mobile), and undo or redo their actions. A warning flags artwork that is too low in resolution for the print size.
- Review: sizes, placements and the price confirmed by the shop. They can download a quote, create a share link or add to cart.
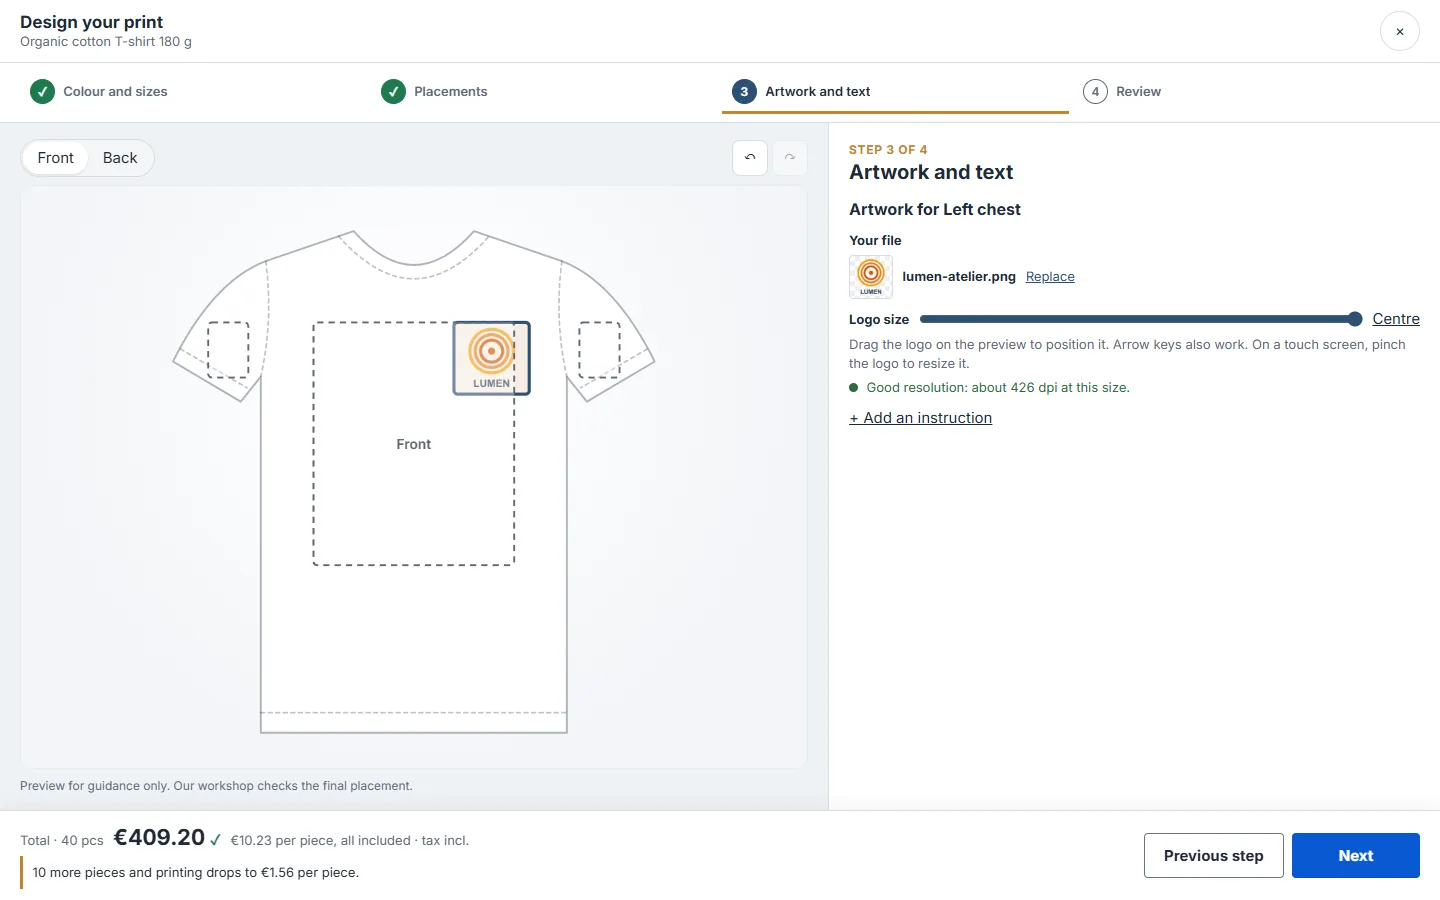
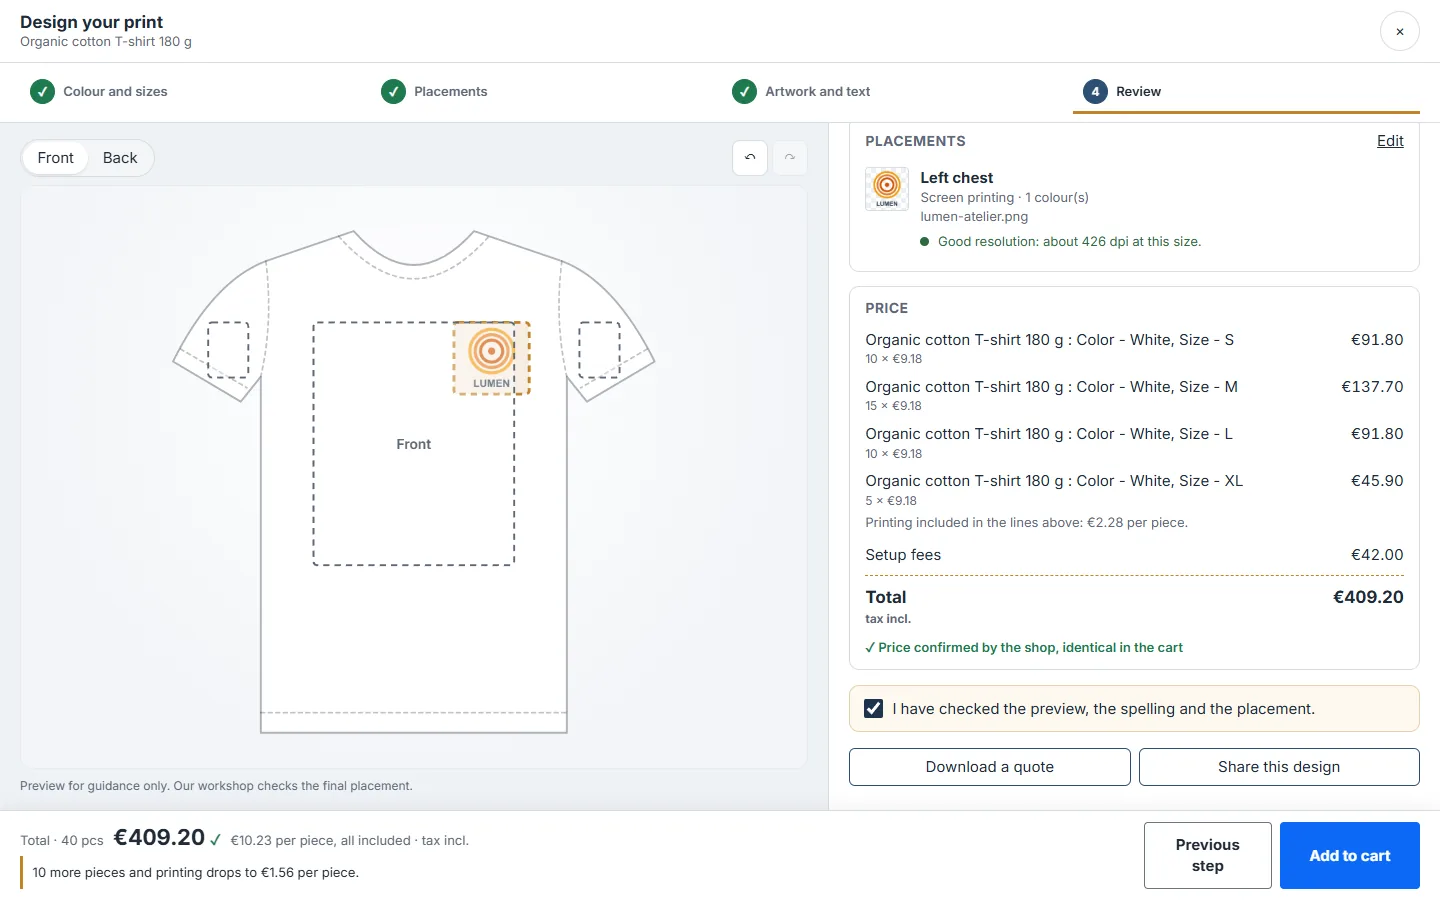
Native product quantity discounts and pieces already in the cart are taken into account. If the same file is already in the cart on another product, in the same placement with the same technique and colour count, the tier is calculated on the total and setup fees are charged only once.
Share links
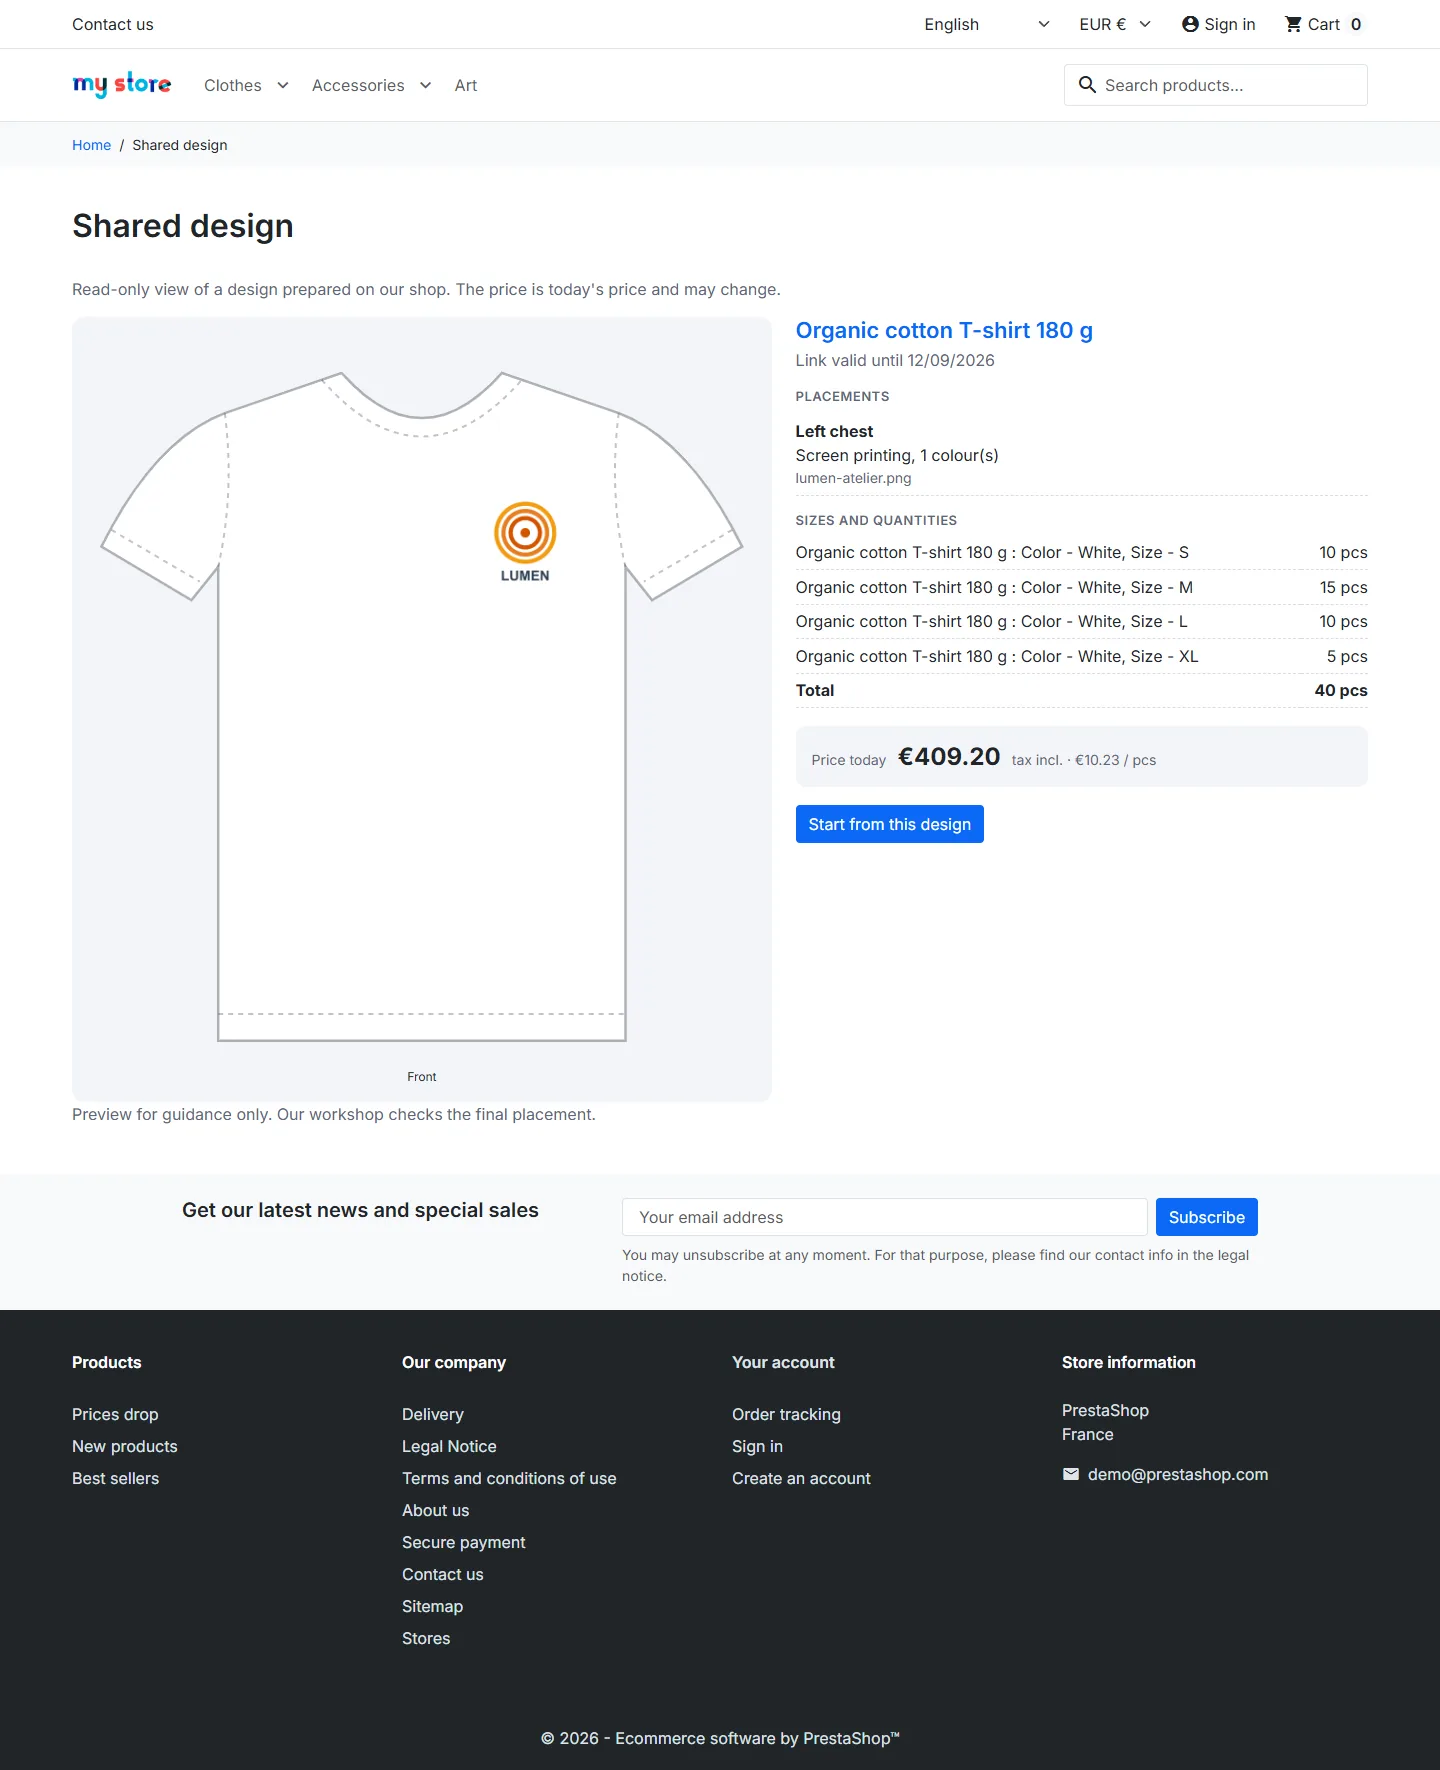
At the Review step, customers create a read-only link. The public page shows the preview, placements, sizes and today’s price, with a Start from this design button that opens a copy without changing the original design. The page is not indexed by search engines and does not pass its address on to other sites. The link expires after the set period; its author can disable it, and the Share links tab in the back office lists every link with its views and lets you disable it.
Cart, order and invoice
Each size and colour line carries the printing price per piece and the print summary. The setup fee line is locked to one unit and cannot be removed on its own; it disappears with the print job. If a percentage promotion applies to the product, the module offsets it so the printing stays at your grid price. A customization line added from another cart is removed.
After ordering: files, proofs and statuses
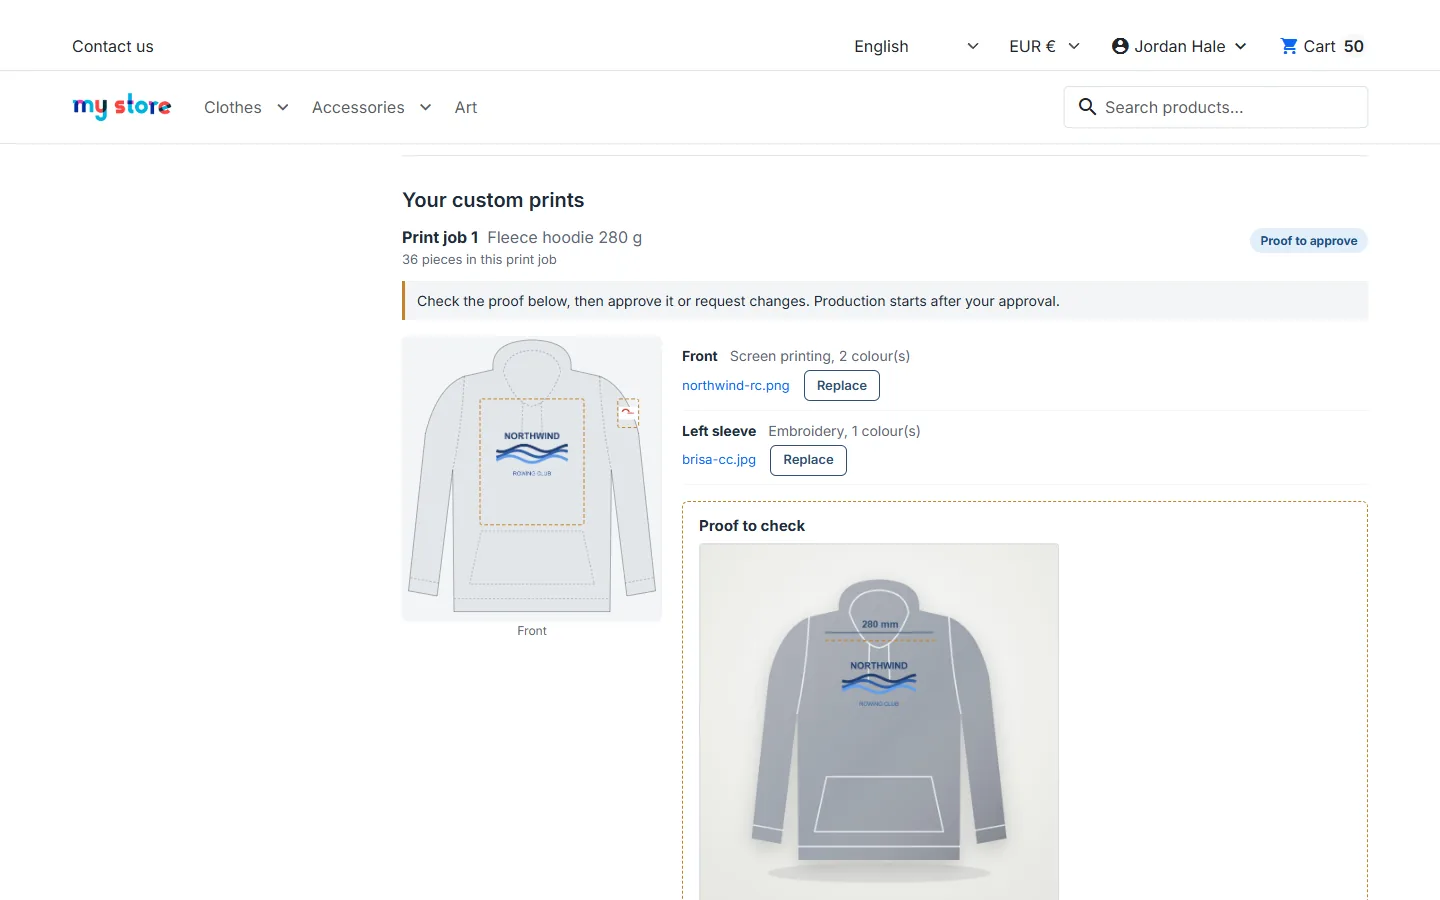
Each ordered print job follows a status: file awaited, file received, proof to approve, changes requested, proof approved, in production, completed.
- Customer side: from the order details (Classic and Hummingbird themes) or the secure link in the email, which also works for guests, the customer uploads a missing file, opens the proof, approves it or requests changes with a comment, and can reorder the same print job at today’s prices.
- Shop side: the module’s panel on the order page shows the mockup, the size breakdown, the files, the instructions and the history. You send the proof (image or PDF) and change the status there, with an optional email to the customer.
- Order status: choose the PrestaShop status to apply when all print jobs are in production, then completed.
Production tracking and workshop sheet
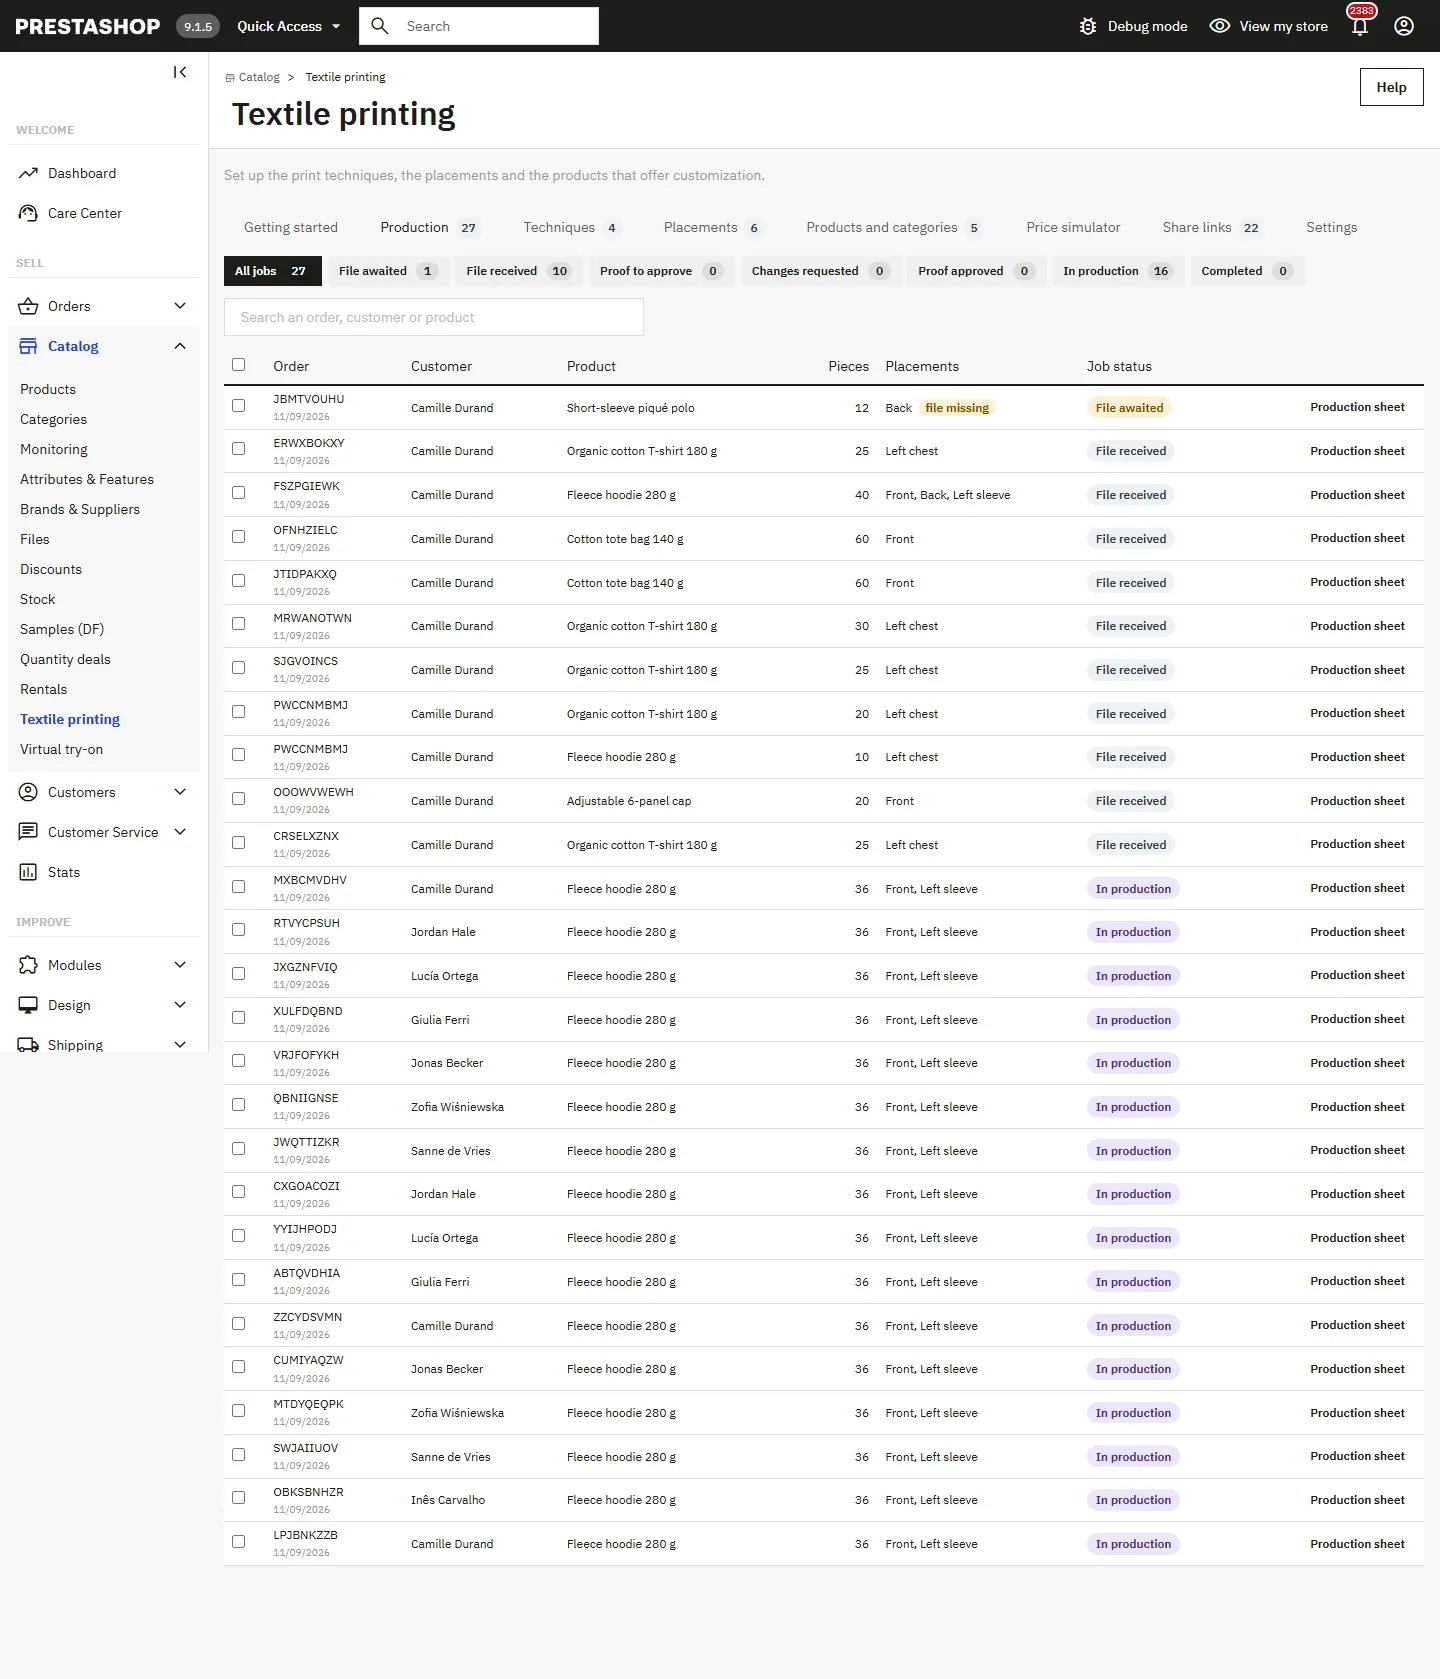
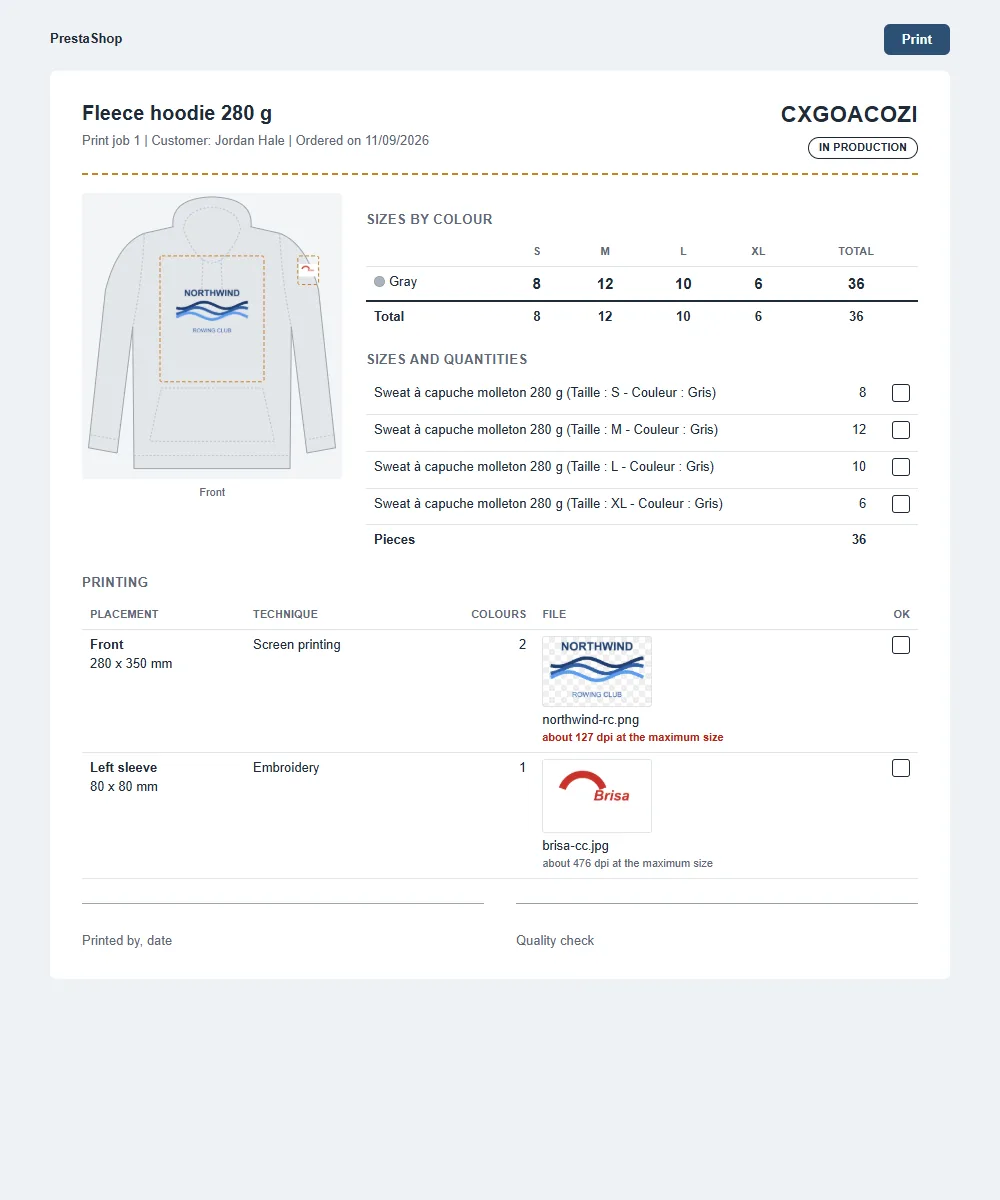
The Production tab lists every ordered print job, sorted by urgency, with status filters and search by order, customer or product. Tick several rows to change their status at once or print their sheets. The workshop sheet shows the preview, the size × colour matrix, the placements and techniques, each file with its estimated resolution at the maximum size, the instructions, the name list and check boxes. Name lists can also be exported as CSV from the order.
Reminders and automatic tasks
A reminder email is sent once when a proof or a file has been waiting for the chosen delay. Reminders and the clean-up of abandoned files run on shop traffic, at most once an hour. You can also call the cron URL shown in the Settings; it is protected by a key that you can renew, and two simultaneous calls never run at the same time.
File security
- Files are checked by content: a file whose content does not match its extension is refused, as are images with excessive dimensions.
- SVG files are cleaned on upload (scripts, external links and entities removed).
- Files are stored under a random name in
/upload/dftextileprint/, which cannot be reached from the web, and are only served to their owner or to the shop. - Uploads and quotes are protected by a token specific to each visitor and limited in number.
Uninstalling
Uninstalling deletes the tables, the settings, the tab and the customer file folder. The setup fee product is only disabled, because past orders refer to it. Export what you need before uninstalling.
Troubleshooting
- The card does not appear on the product page: check that an active rule covers the product and that at least one active placement and technique are offered. The Getting started tab shows the number of active rules.
- The designer only shows a Quantity field: choose the size attribute group in the Settings.
- Setup fees have no tax: choose a valid tax rule in the Settings, then save; the check in the Getting started tab should turn green.
- A file upload fails: compare the file size with the limit shown in the Getting started tab; raise upload_max_filesize and post_max_size with your host if needed.
- Changes do not show after an upgrade: clear the cache in Advanced Parameters > Performance.
- An employee cannot send a proof: they need edit rights on orders or on the module.